
Secret Menu
Congratulations, you've found our secret menu. Here you can find products which don't fit in, are oddball, we can't produce in large volume, don't have the level of polish we expect from our standard line of products, are experimental, are pet projects, etc. Keep an eye on this space as we don't advertise it, and you never know what you'll find here, but don't forget this page exists for you: our loyal fans and customers.
Rev.3 Upgrade Core for Pugio / Falx / Sarissa / Mus II / Accipiter

Rev.3 Upgrade Core for Pugio / Falx / Sarissa / Mus II / Accipiter
This upgrade brings your existing moderator to the current Rev.3 specification which is the most substantial single improvement to the moderator line since we moved to the aluminum tube architecture.
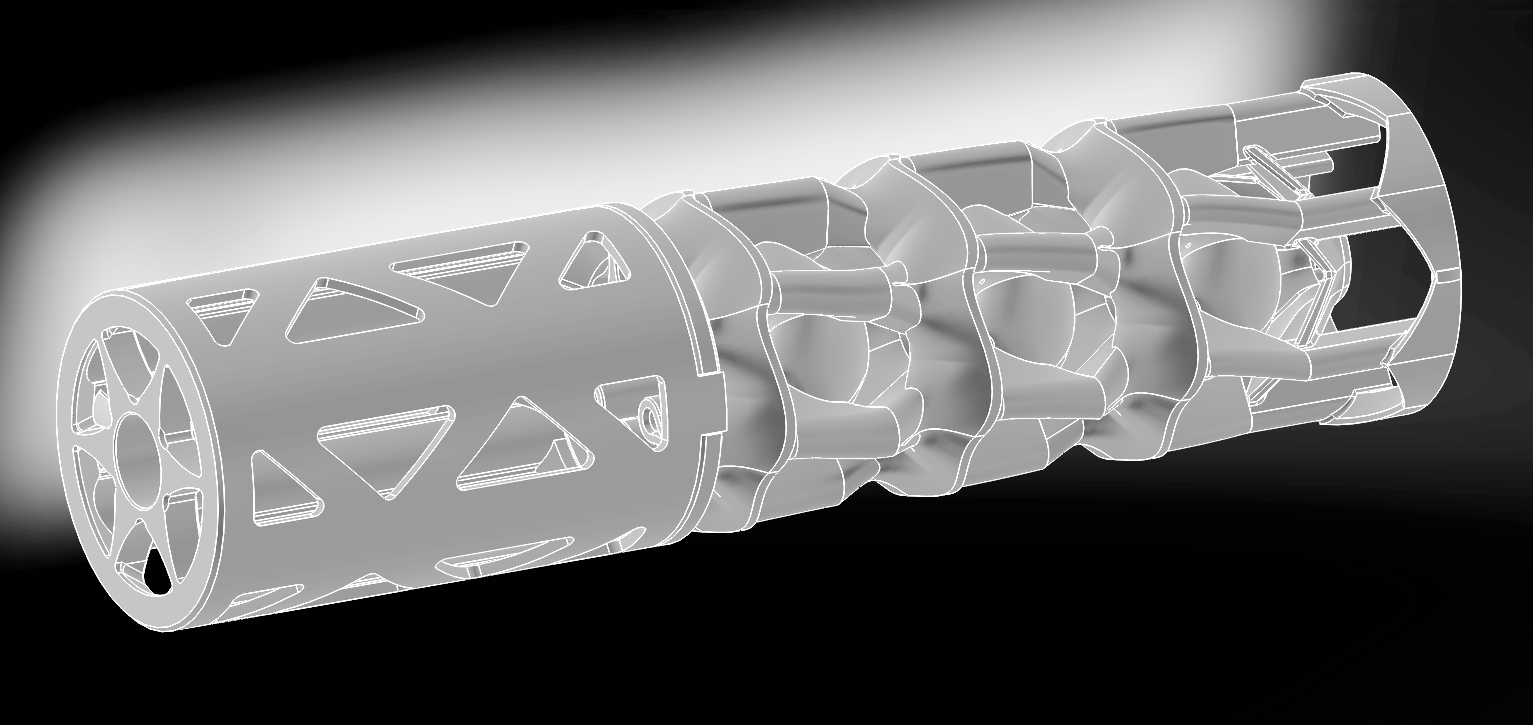
To understand what changed, a quick primer on how our moderators work. Each design is built around two technologies operating in sequence: gas diodes and acoustic damping. Gas diodes, a valveless fluid control technology invented by Nikola Tesla, delay and redirect propellant air through geometry alone, with no moving parts. This is what separates our designs from conventional baffle stacks, and it's primarily responsible for reducing peak sound pressure. Damping material follows the diode stages and handles a different problem: absorbing the sound energy that persists after that peak.
Both matter. Peak is the maximum instantaneous pressure of a shot event. RMS is the total sound energy over the full duration. A moderator that hammers down the peak but leaves a long, elevated tail will still sound loud to the ear that integrates that energy. Good suppression requires addressing both.
Previous revisions focused primarily on diode geometry, which benefited peak reduction. Rev.3 is a ground-up overhaul of the damping system. Closed damping material surface area increased dramatically, and the open damping material was re-tuned from scratch for improved flow resistivity and acoustic impedance. Critically, the damping section no longer functions as a largely independent third stage bolted onto the end of the diode stack instead it's been redesigned to integrate tightly with the diode stages that precede it.
The result is meaningful improvement in both peak suppression and total A-weighted RMS noise reduction across all flow ranges: standard through extra high.
Durability was also a driver. As big bore airguns have become increasingly common at the upper end of our supported flow factor range, the damping section was seeing sustained stresses it wasn't originally designed for. Rev.3 addresses that directly. If you're shooting at the lower end of the flow range, the durability improvement is largely academic for your use case — but the acoustic gains apply regardless.
This item ships within the United States only.
Configuration
These cores are fully compatible with all previous versions. The only compatibility consideration is when changing to and from big bore calibers (0.357, 0.45, 0.50) as the end cap also needs to be changed to one with a suitable bore. Those can be ordered here: https://www.silentthunderordnance.com/air/falxsarissaaccipiter-end-caps
Installation
If you would like us to replace the core in your moderator we are happy to do so for only the cost of shipping, email us for details on this process. If you would like to swap the core yourself, instructions follow.
Step 1 - Remove front and rear end caps. These can often be removed by hand with the aid of a rubber sheet but an end cap removal tool is included with replacement core orders. The removal tool is used in conjunction with a vise to remove the end caps regardless of how secure they are.
Step 2 - Press the core out with suitable rod, most should slide right out with light force but some may require a bit more force, especially if they are well used.
Step 3 - Reinstall front end cap
Step 4 - Insert green and black damping section with the extended green part first, towards the front end cap. Note how the extended part sits inside the front end cap.
Step 5 - Insert diode section with the flat part first to seat against the damping core. This will leave the 3 fins or 3 scoops depending on the core facing the rear.
Step 6 - Reinstall rear end cap.