Project - Mountain Bike Stuff
Silent Thunder Ordnance

It’s probably pretty clear by now that this blog and STO as a whole can sometimes be an excuse to develop stuff for our hobbies and figure out if it’s a viable product later. And this is no exception. Recently I’ve gotten a bit more interested in mountain biking and seeing that I can’t leave anything well enough alone, into custom building electric mountain bikes. After looking around at all the options for motor kits (starting with a kit in a vague hope to not let this turn into a endless project) I settled on the TSDZ2 motor due to it’s compact size and torque sensing feature. But you know I couldn’t leave that well alone either so then went in flashing the open source firmware, running it at the max voltage of 52V with a custom built battery pack, making a custom torque arm, replacing all the bike’s drivetrain to match up nicely, modifying the frame for perfect chainline, installing a temperature sensor, and finally improving the thermal performance of the unit. Many of these you can lookup or easily figure out how to do so I’m just going to cover the more specialized upgrades.
As many a DIY ebike enthusiast has quickly realized fitment on bikes other than the most basic of hardtails can be tricky and in the case of the torque arm fitting my bike’s rear suspension setup that was the case. To keep the motor from rotating around under torque you need to secure it to the frame rotationally which is normally done with a little piece that clamps to the chainstays that would be present on a hardtail. Easy enough I’ll just make a bracket that wraps around the seat tube and locks to the motor using the original mounting bolt. Considering the amount of torque this needs to withstand one would think that it needs to be made of metal. But 1000s of hours of 3D printing experience and a fascination with advanced material composites says otherwise. I whipped up a quick design to be printed from carbon fiber reinforced nylon and included wrapping guides for additional fiber reinforcement. With a little epoxy and some 100lb test kevlar braid it’s easy enough to add a theoretical 4000lbs of extra tensile strength to the part. Kevlar was used instead of UHMWPE or Carbon fiber because it’s easier to work with than carbon fiber and glues better than UHMWPE which has a terribly low surface energy.

Next quick modification was grinding down about 6mm of the bottom bracket to get the motor far enough over for a perfect chainline. This was done, very carefully and precisely with an angle grinder and flapwheel. All kidding aside if you are very gentle, use wax to prevent the wheel from getting clogged up do to the affinity of aluminum to the aluminum oxide abrasive and take lots of measurements the final result was well under 0.5mm of parallelism with the factory side. A side bonus of this is the Q-factor is now just about perfect down the centerline with the help of an straight right side crank.
For all the advantages of the TSDZ2 it has some issues as well and one of the biggest issues is it’s poor motor cooling. For some unknown reason the designers though it was OK to just have the motor in an entirely sealed case with no contact to the aluminum body at all. With the stock setup it’s very easy to overheat the motor and if you don’t install the open source firmware thermal throttling or a thermal probe to keep an eye on the temperature it’s very easy to damage it in the process. Many past attempts have been made to remedy this and the most effective and easiest was by najbyk as shown in the wiki (https://github.com/OpenSource-EBike-firmware/TSDZ2_wiki/wiki/How-to-improve-motor-heat-dissipation) which filled the approximately 1.5mm gap between the motor and shell with thermal pads. The only problem with this solution is even at that thickness thermal pads have very poor performance so gains are limited. My simple solution to this problem was to just replace the pads with aluminum which is an order of magnitude more thermal conductivity than the pads. As a first test I hand cut shim a shim and after that performed wonderfully proceeded to CNC cut them for an exact fit. With the original test shim and the back thermal pads between motor and outer shell I was unable to get the temperature above 42C even with hard use. I expect the CNC version will perform even better since it is one piece instead of two sheets but the cold weather means it’s hard to tell real results from cold ambient assisted cooling.
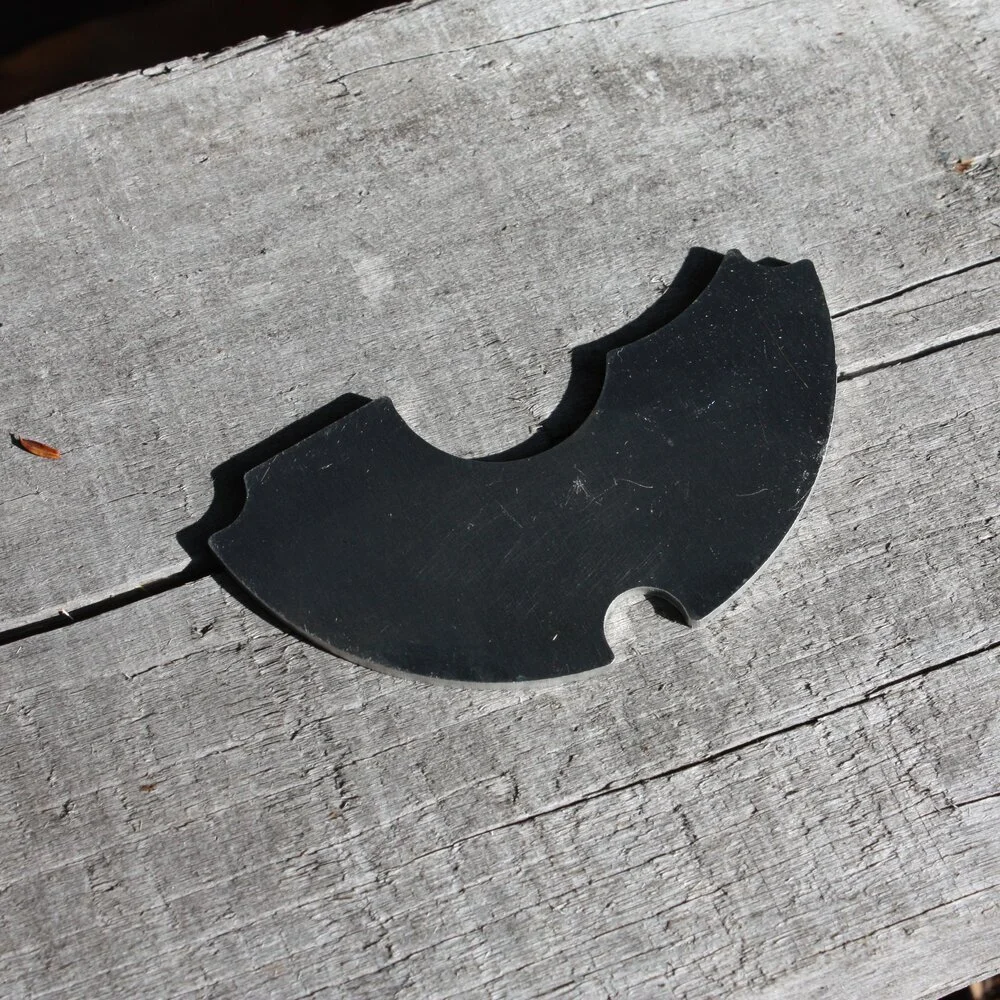
For those of you who are interested in installing one here is the step by step, mostly you can just follow the steps in the wiki linked (https://github.com/OpenSource-EBike-firmware/TSDZ2_wiki/wiki/How-to-improve-motor-heat-dissipation) and of course install the heatsink plate with some thermal compound instead of the thermal pads.
Breakdown:
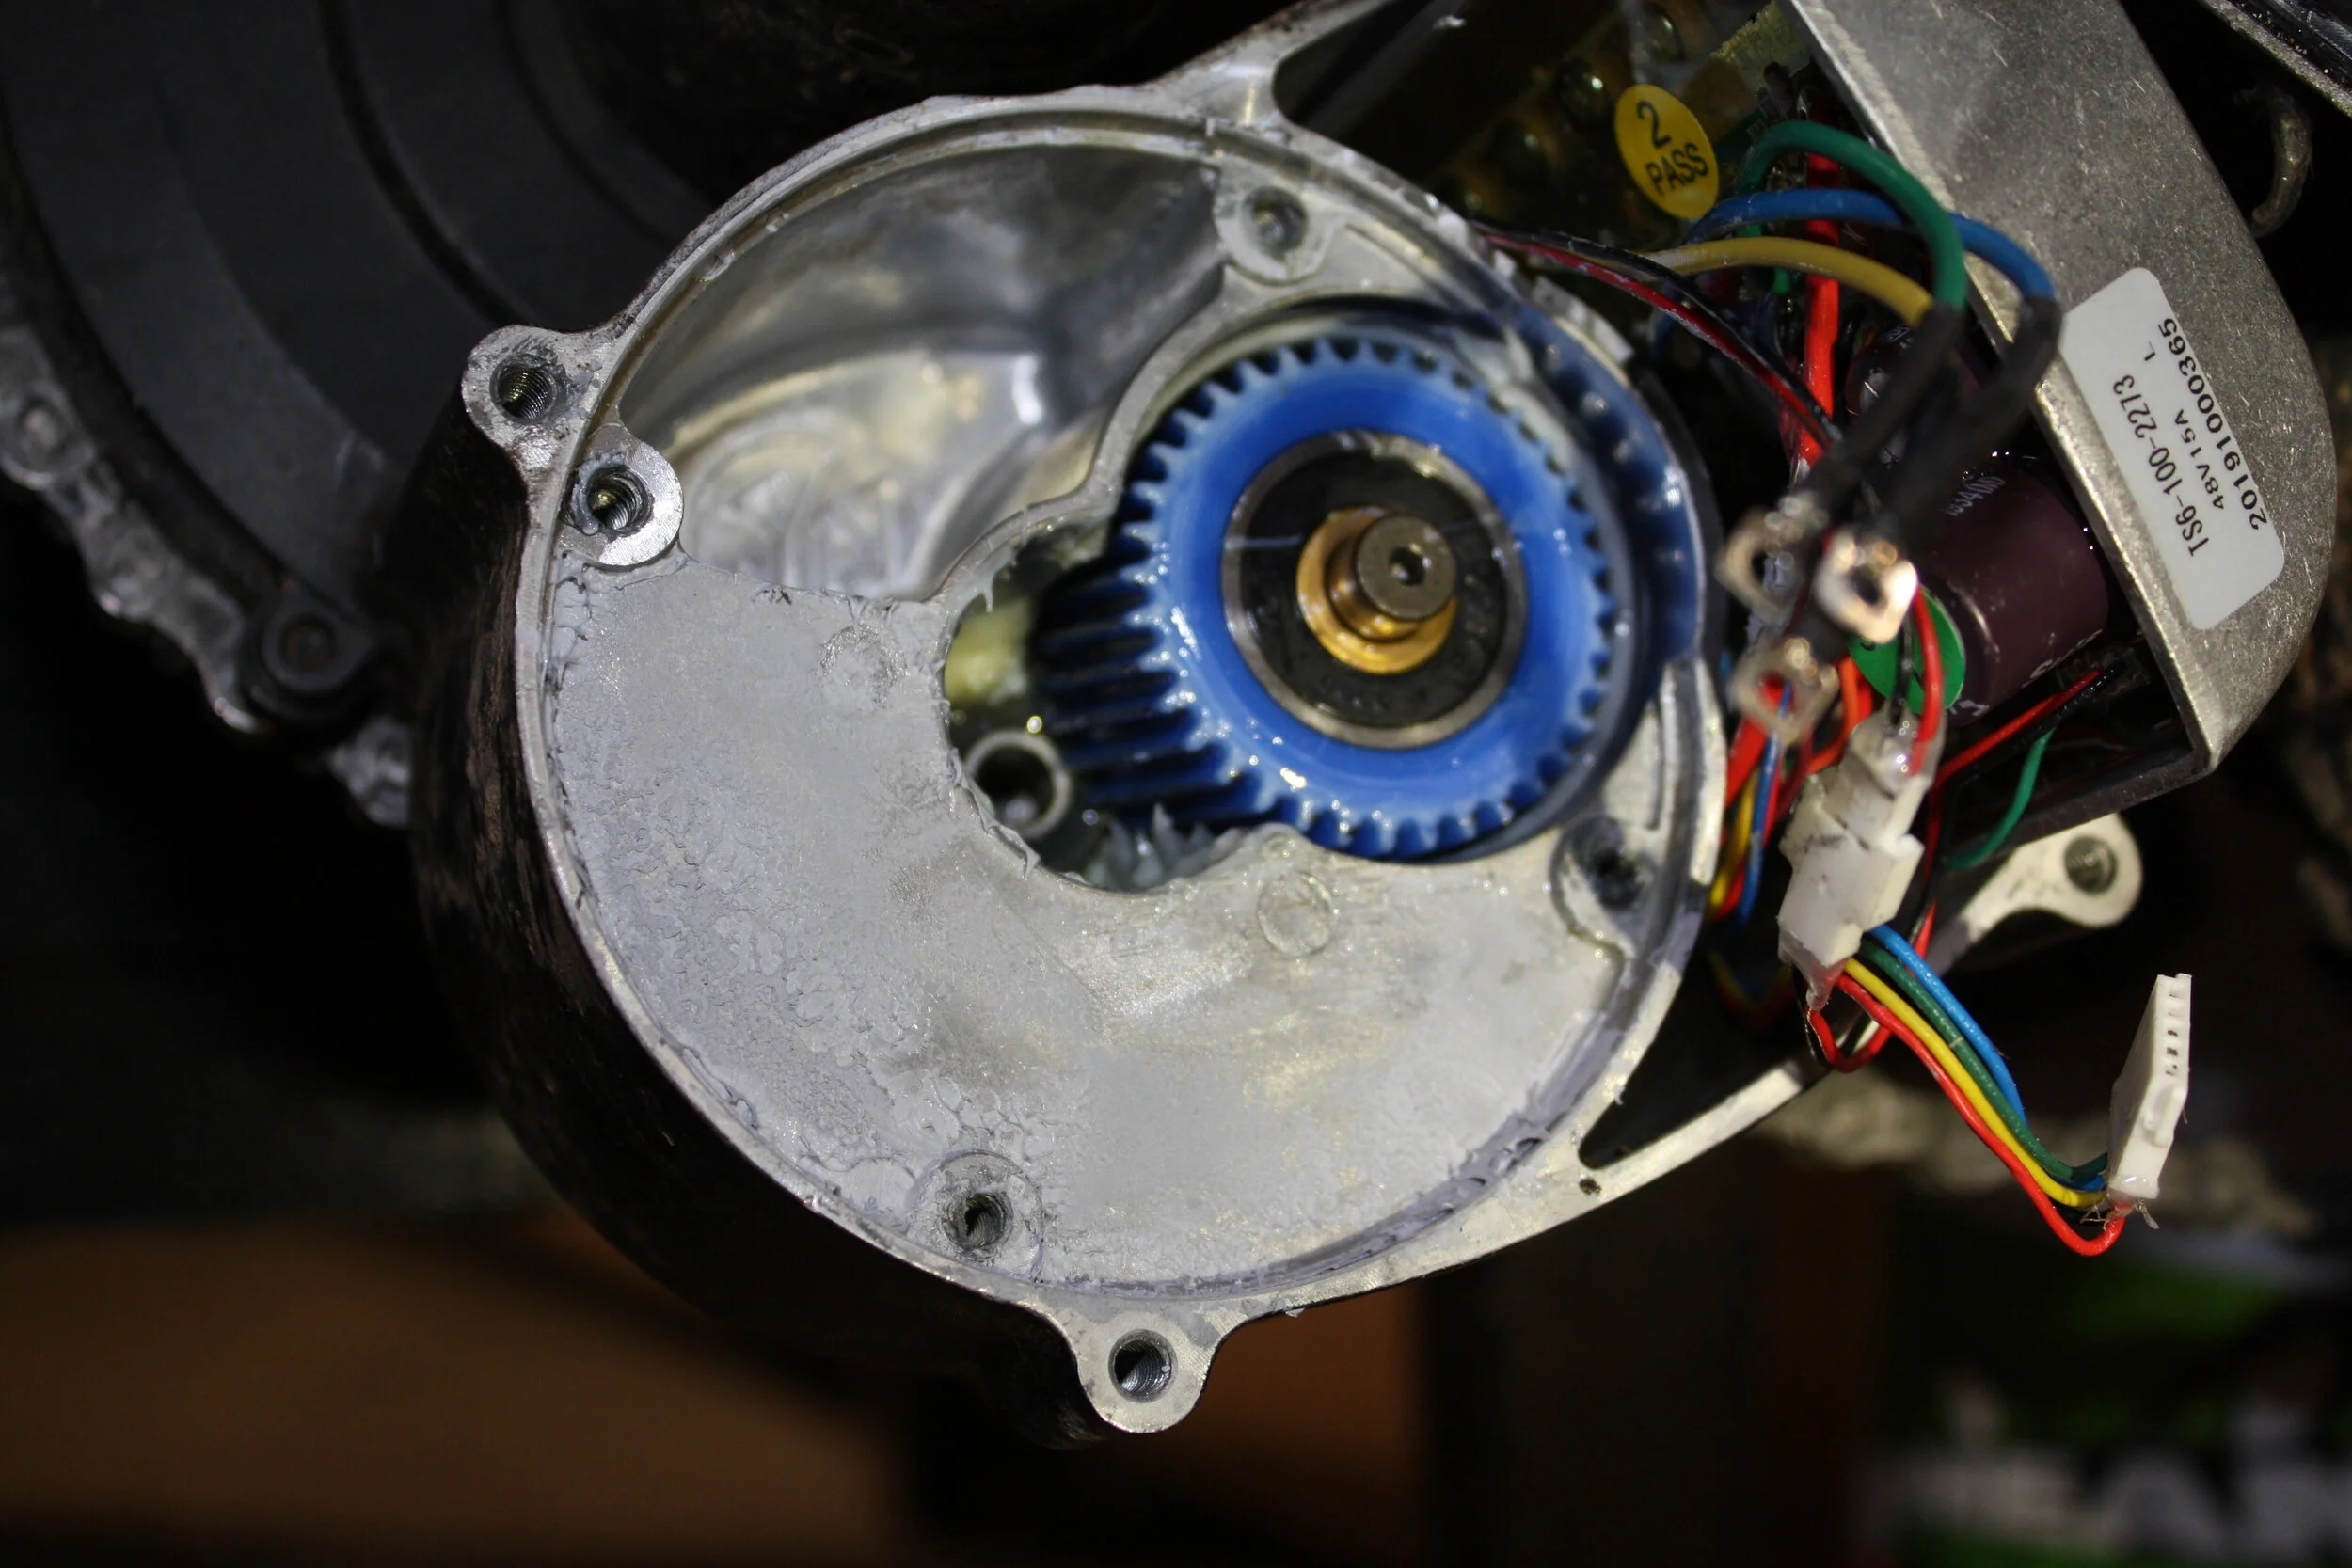
Remove the motor cover (4 screws), then the motor (also 4 screws around the base), disconnecting the phase wires and encoder plug. The motor will probably require a bit of wiggling and pulling to slide out.
Motor Tweaks:
As shown in the wiki, take apart the motor (6 screws) and apply some thermal compound between the motor endplates and the stator. My personal recommendation for thermal compound is MX-4 for it's good performance to cost ratio. Then reassemble the motor but be careful not to over tighten the motor bolts, they are M3 threads in aluminum so could strip easily if you apply too much torque.

Check contact points:
Check to make sure there are no casting marks on the motor endplate or gearbox case that stick up from the surface and would prevent the heatsink plate from sitting flat, the gearbox housings occasionally has some little ones that should be smoothed out.
Heatsink Plate install:
Apply thermal compound on the gearbox side of the heatsink plate in several small (about grain of rice sized) dabs. Install heatsink plate onto gearbox housing and press down as hard as you can, wiggling slightly. Wipe up any compound that oozes out from the edges. Apply compound to the other side of the plate in the same way and around the motor endplate perimeter (as shown in the wiki) and reinstall the motor.
Motor reinstall:
Tighten the 3 bolts closest to the heatsink plate first, evenly in a circle. Then snug up the 4th bolt. Reconnect the phase wires and encoder plug (little contact cleaner couldn't hurt hear if you've got some). Then just reinstall motor cover and enjoy the cool temps.
You might have noticed the tone in the this blog post is a little different. While this might come as a shock, I’m not the usual blogger for STO. But I hope this is an interesting and maybe even useful read.
-B