Contact Us

Use the form on the right to contact us.

We offer extreme-performance custom flashlights, EDC, and accessories. Home of the world's most powerful production LED thrower with 3 kilometers ANSI throw. 

IMG_20180919_152657237EDITED.jpg

Blog

Keep up with the latest sales, discounts, news, product releases, and projects here on our blog. 

COVID-19 UPDATE

Silent Thunder Ordnance

The global pandemic caused by the novel SARS-CoV-2 virus is, inevitably, causing disruptions and necessary changes in practices. We are still accepting and shipping orders, the stock on our website is live, however we’re making a wide variety of changes to reduce exposure and maintain health and safety.

How does this affect you?

First, effective immediately, orders will be shipped M/W/F, rather than the usual next-business-day.

Second, please understand that carrier transit times are longer than usual. With panic buying, workforce disruptions, and people generally staying home, we’re seeing an increase in shipping times. That is to say the time from when we deliver the order to the carrier, and when the carrier actually delivers it to you the customer, is increasing. We’re also seeing an increase in “unusual” tracking activity, that is to say scan events which may not be accurate or representative of what is actually happening. These issues tend to resolve themselves, but we have to ask for your patience and understanding as we all work through this.

Thank you everyone. Please stay safe and healthy. May we all get through this together. :)

Dual Sheath Dashi

Silent Thunder Ordnance

Celtic engraved matched set of left and right handed dashi in a dual-dashi-sheath

Celtic engraved matched set of left and right handed dashi in a dual-dashi-sheath

This was a very special commissioned project. It was so special in fact, we had to hold all photography of it until after it was given as a surprise gift. What you’re looking at are a pair of scalpeldashi, one in Ultramarine Depths and one in Sandworm Ivory. The former is a typical “right handed” dashi, while the latter is left-handed. This is not as simple as you might think, as they are not simple mirror images of each other. The two were paired together in a custom ambidextrous dual-dashi sheath. A celtic knot engraving then covers the the whole piece, dashi and sheath.

While the design was originally conceived as a matching pair sort of thing, around the office we quickly started picking up this dual sheath for our own uses. It will hold two right (or left) handed dashi, and provides convenient quick access to them. Given the huge diversity of blade styles available, this became a convenient way to have multiple on hand.

Celtic engraved matched set of left and right handed dashi in a dual-dashi-sheath.

Celtic engraved matched set of left and right handed dashi in a dual-dashi-sheath.

45 State Bugout Bag

Silent Thunder Ordnance

IMG_20200317_112059616.jpg

What with COVID-19, somewhat irreverently known as the “kung-flu,” tearing its way through the world, thoughts naturally trend toward worst case scenarios. The great toilet paper and hand sanitizer purge is a prime example of this, fear is driving unnecessary hoarding. Grocery stores are being emptied of all TP, and we’re even seeing some of the first known cases of people willingly, in what I can only imagine is absolute dire need, spending real money on “dude wipes.”

On a more serious note though, what would happen, what would you do, if some worst case scenario came to your city and you had to get out of dodge? Are you prepared, and what would your bugout bag look like? In a way, it is EDC on steroids. I should also add that this ought to be tailored to you personally, matching your skills and likely bugout environment. Carrying a survival saw for example is incredibly useful in a forested area, however in the middle of a desert maybe not so much. Likewise if you haven’t been put through survival training, a proper compass may not be particularly useful to you. It is also meant to complement what I already EDC, but not replace it. I also built it out to be what I call “45 state legal,” which is to say something you could carry almost anywhere. Even in most of Europe, this should be more or less legal. That means, specifically, no firearms. Should it be that kind of bugout, there are a whole suite of different things, weapons, armor, and ammo which ought be carried, and are beyond the scope of this blog post. So here is my bugout bag, built with the expectation of, not long term outdoor stays, but short term outdoor “excursions” to get out of dodge, or get places which otherwise may be hard to get.

IMG_20200317_111435178.jpg

Food/Water/Shelter

  • Mylar emergency blanket - too small, light, and useful not to have. Good for survival, but also emergency signaling as it is bright gold on the outside.

  • Mylar tarp - heavier duty, longer term, grommets at the corners, and OD green on the outside so reasonably camouflaged. This is a repeat use item rather than an emergency one. I’ve spent more than one night under this.

  • Bug net - you can wear long pants and sleeves, but just a few bugs in your face can make life really tough.

  • Serious socks - wool hiking socks. These are dual purpose, working as emergency mittens if necessary.

  • 5 mil contractor garbage bags - these fold tight and serve a million and one purposes. They burn well, they build shelters, they make a serviceable rain poncho, they can carry water, solar still, bedding, the list just goes on and on and they are very compact. If you’ve been through survival training, you don’t need any more explanation on these.

  • 2 liter Nalgene

  • 2 liter water bladder

  • 1 liter water bladder w/ integral filter

  • Water filter - why so much water capacity and two filters? You can go weeks without food, but if you’re hiking hard you’ll consume water at a staggering rate. Good sources are also not always easy to come by. Stock up when you can, and be sure you have a way to purify it on the move.

  • No food - The plan isn’t to spend months outside, just days, and most of that time should be spent covering ground as rapidly as possible. A few days without food is no big deal. If you need some though, as crazy as it may sound, dry dog kibble is a great choice. Why? It is nutritionally dense, light weight, shelf stable, and you’re not going to snack on it frivolously so it’ll still be there if you ever REALLY need it.

IMG_20200317_105847718.jpg

Emergency Medical

  • Basic medical kit - A trick here is to get a basic medical kit and then supplement it. Many of the things below are simply that. This makes it easy, and gives you a convenient case to keep everything together as well.

  • Lighter - I know we sell two types of lighters, and I still recommend a bic lighter here. Why? An arc lighter doesn’t sterilize tools well, and a wick based butane lighter slowly leaks fuel. Neither are a good way to store energy for years and years without attention or use. Meanwhile a couple cent bic lighter will be around forever.

  • Superglue

  • Steri-Strips

  • Nylon monofilament needled suture - when you need to suture something, there is little else which will substitute. They also can be bent into an emergency fish hook.

  • Triple antibiotic ointment

  • Bandaids

  • Tongue depressors - dual use, medical and kindling in an emergency.

  • Gauze - same as above

  • Potassium iodide tablets - thyroid blocking in a radiation emergency

  • Tweezers

  • Silicon nitride tipped tweezers - can be sterilized in fire without damage

  • Sterilizing wipes - “moist towelette”

  • Sterile gloves

  • medical tape

  • safety pins

  • Sterile scalpel blades

  • benzocaine pads

IMG_20200317_112059616.jpg

Tools & Weapons

  • Large knife - 8.1” Morakniv with sheath. We live in an age of embarrassment of riches, with so many great options on the market from Busse/SYKCO to ESEE to SURVIVE!, however part of a bugout bag is it doesn’t get used all that often. So a couple hundred dollars for a big knife that’ll rarely be enjoyed might not be money well spent. Contrast that with a big Mora. They’re tough as nails, well made, light weight, work great, and can be had for embarrassingly little money.

  • Scalpeldashi - serves the “small knife” requirement. Incredibly useful. Spare sterile blades too.

  • Sharpening stone

  • Survival Saw - Boreal 21 is my pick, even better than the vaunted and no longer available Sawvivor.

  • Slingshot - I specifically bring a Harpy, but bring what you’re accurate with rather than what is smallest. Should the time come, you won’t be thankful your slingshot is tiny, but you will be thankful your slingshot is one you’re very accurate with. Wrap this in a protective bag to keep it away from oxygen and light. Not only is a slingshot a great weapon/diversion tool, ammo can be picked up as you go giving it almost “limitless” capacity.

  • Spare bands, wraps, pouches, and ammo - Wrap these in a plastic bag as well to keep them in good shape for when you need them. I’m partial to alliance bands, as they’re much longer lasting, both use and storage, than typical exercise bands.

  • Eyepro - not just from projectiles (you are bringing a slingshot after all) but from sun and weather. It sounds goofy, but you only have the two eyes. An inexpensive pair of impact rated glasses, tinted or not, cost almost nothing and weigh almost nothing. They also go well with firearms, should you be bringing those.

  • Paracord - I always wrap this on my knife sheath. Handy place to store it compactly, and right next to the tool you’ll need to use it. Don’t skimp, real milspec 550 cord comes on big spools for surprisingly little money.

  • Ferro rod - I know I said a lighter above, however even the enduring Bic is transient and easy to ruin next to a ferro rod. This will sit idle in your pack practically forever and always produce hot sparks when you need it.

  • Orienteering Compass

  • Lockpicks - multi-use. Picking locks? Hopefully not. They’re very thin spring steel with useful shapes though to be a probe, prybar,

  • Monocular - (daylight)

  • Faraday bag - Even when turned off, your phone is never truly “off,” and surveillance increasingly leans on technology. A faraday bag you can drop your phone in and truly go dark is compact, light weigh, good for other things, and a cheap hedge should you need to “disappear.”

  • Backpack - all this gear needs to go in something. In this case I’m using a Teton Sports Oasis 1100. It is very light, well thought out, lots of useful quick-access pockets, includes hydration, an emergency whistle, and an integral rain fly. Don’t take this as an endorsement per se, it works, but I’ve also not taken this bag to hell yet. As a result it looks good on paper, but nothing is ever truly great until field proven.

Things Unsaid

  • Hiking Boots - you’re going to be covering ground. Have a good pair of boots, ones broken in and proven.

  • Season appropriate clothing - winter in the north or summer in the south of the United States can be brutal. Seasonally appropriate clothing is critical. Wear it/bring it with you.

  • Flashlight - Batteries don’t store well. As a result, this is an EDC item rather than a go-bag item as it can’t be practically stored in a state of readiness. Keep in mind a light with very long battery life is much more useful than a pocket rocket. Potentially a relatively dim red light is also highly useful.

  • Phone - you’d expect to find this in your pocket, not your bugout bag. These tools are oh so useful for easy orienteering, info, etc but they’re a double edged sword as they can be used to track you and are notoriously unreliable when you need them most. Don’t be dependent on your phone.

  • Cash

  • Map - grab one for wherever you’re going before you leave.

  • Pet supplies/Bugout Bag - You’re not going to leave your beloved and loyal companion behind are you? Pack a bugout bag for your best buddy as well. If you have a dog for example, bring the basics you need to cover ground, such as a water bowl so they can drink without lots of spill, and a wrap if they break a claw or tear a pad. The last thing you want is to have to carry your animal. Dogs in particular can be incredible assets as well, being extremely alert and astute.

  • Keep it light! - Remember the point of bugging out: to cover ground, and cover it fast. This isn’t a camping trip.

  • Have a plan! - Have a reasonable plan for where you’re going, how you’re going to get there, and how long it is going to take. Preferably let someone know this.

  • Store your bag somewhere useful! - I keep my bugout bag in my car. Why? Because wherever I’m going, my car is probably going to be the first step to getting there. It also allows me to carry a lot more other gear I’m not planning to keep on my back.

The whole thing, including containers but not the water they carry, weighs just 4.2 pounds. A key idea to bugging out is to NOT put yourself in a survival situation. Have a plan, and strive to ensure this doesn’t become a survival situation. And that is part of the mindset here. Long term, you have incredibly poor prospects for survivability, producing enough food to sustain yourself alone in the wilderness is incredibly difficult. Thus this bugout bag doesn’t have such lofty goals. Again, the plan needs to be a relatively quick jaunt from an unsafe area to a safe pre-existing shelter which is out of the crisis epicenter. If it is going to be weeks of hiking, you require a LOT more gear, and largely that is gear oriented for the season you’re currently in. Also don’t undervalue your car. Tools, weapons, ammunition, maps, food, water, fuel, loved ones these are all things easier for your car to carry than your arms and legs. Take the easy road as long as you can.

I hope this was interesting, and potentially inspirational, for your own bugout gear. Everyone has their own skill sets, and how that interacts with location and season. Personalize and pack your own bag accordingly. May we all never need it. Stay safe and healthy everyone. :)

IMG_20200317_113149367.jpg

Product Introduction - Full Throated Scalpeldashi

Silent Thunder Ordnance

Fullthroat scalpeldashi. Bottom is silicon carbide which has been copper washed and engraved

Fullthroat scalpeldashi. Bottom is silicon carbide which has been copper washed and engraved

Ever since we introduced our original scalpeldashi, we’ve gotten requests for a longer full-throated version. Something with more handle, which can still fit easily in a pocket, but is equally at home on a desk. So this, is that. We’ve added fullthroat dashi to our standard lineup in our popular silicon carbide composite, a rugged material in stealth gray. We’re, of course, also doing one-offs and customs in this new style too.

Another advantage of the longer handle is more real estate for engraving. As seen above, some really beautiful and exotic things are possible, from sweeping natural curves to alien artifacts.

Fullthroat dashi in nocturnal blue and glow in the dark ivory

Fullthroat dashi in nocturnal blue and glow in the dark ivory

Airgun Moderator Design, Performance, and Development - American Air Arms Slayer and Brevitas (part 14)

Silent Thunder Ordnance

Catch the previous episode HERE.

Perpetually short on time, I’m going to hopefully keep this one brief. Previously, I talked a bit about two projects I was working on. The first was an American Air Arms Slayer mod (two in fact), and an attempt to make the smallest and lightest moderator possible/pragmatic for the FX Crown which I nicknamed the Brevitas. This post introduces essentially nothing new, but concludes those projects.

FX Crown with Brevitas moderator

FX Crown with Brevitas moderator

The issue with the Brevitas wasn’t one of acoustic performance, but rather mechanical performance. coming in at less than 30 grams, 74mm in length and 28mm in diameter, this was never going to be the unspoken last word in silence. That said, both on the .22 and .30 Crowns it brings the peak down below the factory performance with the shroud extended while being about half the length. But mechanical performance, what do I mean? Well the long and short of it is I wanted better impact resistance. Moderators will be subjected to baffle strikes eventually, and being on the end of your gun may just be banged into things from time to time, so I wanted better. A surprising amount of material development went into this, but I can happily say the material now out-performs ABS and Nylon on the IZOD impact tester. It also is translucent, which I think is pretty darn cool as you can kinda see what is going on inside it.

Brevitas TD FX Crown .22 and .30 (two different mods. Note traces are different scale) - 162 & 609.3 respectively

So what about the Slayer? Well the final test for that is in. The slayer is pretty violent, so I wanted to make both mods quite robust. I nicknamed them the Gladius HP and Brevitas HP because both are heavily built high power specific adaptations.

IMG_20200217_112655363Eb&W.jpg

First up is the Brevitas HP. I kinda winged this design, took a few educated guesses, and went with it. As luck would have it, it ended up quieting the Slayer more than the factory mod. This isn’t a huge accomplishment as the factory design had just a couple very long tapered cones, more of a contained air-stripper than a moderator/suppressor, but wherever I can shed weight and length I’m happy, and this did that. And just as a quick reminder, the Slayer is unregulated, and so its sound signature changes considerably across the discharge cycle. The number is just an average, and the trace I pick is meant to be representative of the set, rather than the average necessarily.

Brevitas HP Slayer .30 ~200FPE - 701.71

Slayer Brevitas HP.png

And, finally, the Slayer - Gladius HP combo. I really was somewhere around the sound signature floor with this one. Depending on the test, the tube ping was louder than the muzzle report, which skews the average high. Never the less, I’m happy with the result and (by his comments) the gentleman who loaned me the rifle was as well. And, honestly, that is what matters most. There could be a whole massive thread on depinger design and optimization as well, but in this case these slayers are 3K$ a pop, and I didn’t want to mess with it. ~3000PSI air and potentially explosive decompression can both do weird things to materials, both immediately and over time, and the last thing in the world I wanted to do was put some crazy untested hardware into someone else’s very expensive toy which could damage it or simply make a mess. So here we are.

Gladius HP Slayer .30 ~200FPE - 526.67

Slayer Gladius.png

That is it for now. I realize this was a bit of a quick and sloppy post. I wanted to get everything written up and and out there. This Slayer ended up being a bit of a spanner in the works, the project dragging longer than I’d have liked, so as fun and challenging as it was, I’m also kinda glad it is finished.

Where to from here? Not sure. Ideas for more small and asymmetric designs have been percolating in my mind for some time now. The Leshiy was too asymmetric, that is to say the bore was so close to the wall that serious design/performance compromises had to be made and acoustic performance was lost relative to total length/volume. But what about an asymmetric design that made no scarifies? Something more akin to the Mus, a moderator inside a moderator, except instead of pushing the limits in terms of scope clearance, that extra reflex volume could simply sit below the bore axis out of the way? And what about the little Brevitas? I made the design 28mm because that was the OD of the Crown’s shroud and smaller would look ridiculous, but the TKO I tested was much smaller diameter and there are other guns with skinny shrouds where such a design could be just the ticket. What about something like that, something to push those limits? As always I have more ideas than time to design and test them. For now, I hope this post was interesting, informative, and entertaining.

IMG_20200217_112824803Eb&w.jpg

Scalpeldashi Blade Styles

Silent Thunder Ordnance

Scalpeldashi showing 5 blade styles we frequently use. Handles/blades are, from left to right: Bubinga/#10A, Sandworm Ivory/#40, Summer Sunset/#11, Ultramarine Depths/#10, and Cuttlefish/#16

Scalpeldashi showing 5 blade styles we frequently use. Handles/blades are, from left to right: Bubinga/#10A, Sandworm Ivory/#40, Summer Sunset/#11, Ultramarine Depths/#10, and Cuttlefish/#16

We get this questions often about what scalpel blades are available, will they fit our sheath, and which is your favorite? This post is an attempt to answer that question.

A common graphic showing just a handful of the huge number of different scalpel blade styles.

A common graphic showing just a handful of the huge number of different scalpel blade styles.

To the right is a typical image used to sell some of the more common blade styles. It is far from exhaustive. Blades are available at extremely modest prices, the most common ones are less than 5 cents each if purchased in bulk. More typical pricing is in the range of 7-12 cents per blade for a 100 pack for common styles. Less common styles, blades sterilized by gamma radiation, and stainless steel blades can all be priced a little higher, but are still very inexpensive.

Our seven favorite styles are #9, #10, #10A, #11, #12, #16, and #40. (we offer a sampler pack if you want to give them a all a try) Far and away we use #10A the most, and it is what we supply with every dashi purchased. It is fairly rigid with a fine point, allowing an incredible amount of force to be put behind it. This gives it great precision for accurate work like marking/scoring, but it is perfectly functional for carving, general utility, even opening packages. Its angular style was actually an inspiration for the scalpeldashi itself years back. #11 looks similar, but in practice is very different. It makes sacrifices in rigidity for a more slender blade and even more acute point. It is fantastic for cutting very fine details, particular when accessibility is limited. Both #11 and #16 are sometimes heated, bent/formed, and re-tempered to make specialty tools/cutter heads for unusual applications where sourcing a commercial blade would be difficult. Speaking of #16, this is another good general purpose blade. Wickedly sharp, like all scalpels, with a straight edge and utilitarian sheepsfoot blade it is also great for general purpose but also excels at scraping. Not surprising as it is closely related to a dermaplaning blade. (for those who don’t know, dermaplaning is a common cosmetic procedure where the surface of the skin is scraped and shaved removing the top layer of skin. It is actually rather similar to straight razor shaving in some respects.) #10 is made for slicing, and slice it does. Slicing in softer materials is where we most commonly use this blade. #40 is a double edged blade. Aside from the advantages when piercing or cutting thin slots in material like leather, this blade actually is very useful for EDC. It is a very utilitarian shape, but you get effectively two blades in one. Double the edge retention or keep one exquisitely sharp for critical tasks while you abuse and dull the other edge. #9 is the weird love child of a sheepsfoot safety blade and a chisel. Push cutting in confined space, cutting along a surface but not the surface itself, and scraping are where this blade excels. Genuinely not sure why this blade isn’t more popular, as it is hard to replace. #12

What about sheath fitment though? After all, if you’re going to carry one as part of your EDC, it isn’t much use if you can’t carry it with you. All of the aforementioned styles fit in our standard sheath, though #9 and #12 can be a bit of a squeeze. The reason for this comes down to how the sheath works. You see, most sheaths grip the blade of a knife. Our sheath actually contains torsion bars which grip the scalpel’s bayonet instead. This frees up the design to happily carry a wide variety of blades.

Hopefully that answers the common questions and is a good primer on the subject. Blade preference can be as much about personal taste as application. Thanks to the immense diversity of blade styles available though, there is something for everyone out there.

IMG_20201223_154240097E.jpg

Product Update - Scalpeldashi

Silent Thunder Ordnance

Three chameleon one-off scalpeldashi. From top to bottom: yellow to green, blue to purple, and green to red.

Three chameleon one-off scalpeldashi. From top to bottom: yellow to green, blue to purple, and green to red.

Late in 2019 we promised a shakeup of our popular lineup of scalpeldashi for early 2020. Well here it is! New and better materials, cooler colors, and even tougher than before. And all this while cutting prices, which start at just 25$ for our silicon carbide dashi. (including sheath)

With this launch comes three one-off chameleon dashi. (pictured above) You may recall our chameleon skin finish on our old dashi. This is similar, except now it is no coating, it is swirled through the entire handle! Colors change based on the angle of the light striking it, and the depth and life in the material is impossible to photograph. From top to bottom they are: yellow to green, blue to purple, and green to red. These will be on sale for a limited time.

We’re also accepting orders for custom work, from custom engraving to complete custom dashi to entire custom production runs. If you’re looking for one….. you know what to do. ;)

Airgun Moderator Design, Performance, and Development - Summary of 3 new moderator designs (part 14)

Silent Thunder Ordnance

Catch the previous episode HERE.

I've been quietly beavering away on a moderator project all this time, a project which ultimately was a failure. The idea was to create a truly modular airgun moderator where, instead of just stacking otherwise identical sections where all you are choosing is how loud/quiet and long/short you want your moderator to be, you actually change different modules to tune your moderator to your gun. And this is in line with my research on regular non-modular moderators where I determined that different rifles want different ratios of flow delaying and sound absorbing in a given size envelope. My idea was that this could speed up my research because, if I wanted to try a new configuration, I could make a new module and JUST a new module keeping everything else identical. Unfortunately, ultimately, this whole thing was a failure. The first problem was that each module was a bigger pain in the butt to make than a whole mod, so it didn't actually save any time or effort. And as for the design itself, it worked, but not well enough as the connections between sections took up too much length and volume and weight. So, ultimately, I learned a lot but had to abandon it.

This all got me thinking though: why did I start this in the first place? It was because I wanted to shrink the length and weight of the junk I hung on the end of my barrel. So, I struck out in that direction. In this series of tests I was primarily working on two things: 1) making a MUCH smaller mod and 2) making a more versatile mod.

So the interesting thing I learned working on the Mus was that gas diodes actually need to be tuned to a flow and air volume in order to work effectively. Otherwise they act more like a flat baffle. How can I improve on this? Before I used compound gas diodes, a quasi diode inside a full diode. This was about the limit of how small I could make something given the tube diameter constraints. But what if I moved up to a slightly larger tube, one small enough I'd avoid at least some of the large-tube-diameter issues encountered by large OD moderators, but large enough I could fit a gas diode inside a gas diode? So I thought I'd move up to a 40mmOD tube with the same 170mm overall length and see what I could manage. I've nicknamed this size the Gladius.

Non-compound Gladius Crown .22 – 81.67

SD Gladius Crown .22 – 61.00

DD Gladius Crown .22 – 65.00

So the above three are all on my .22 Crown, same as always. The non-compound Gladius is basically just a scaled up gas diode, and clearly is not as effective. (this is not surprising) The SD and DD Gladius designs are about equal in terms of performance both with each other and are almost as good as a Pilum. Given the tube OD increase, I'll call that a win, as the point was to “prove” the DD Gladius could be effective on the .22 Crown. But the other point was to make a more versatile design, so what about the DD Gladius on the .30 Crown?

DD Gladius Crown .30 – 77.67

DD Gladius VP30.png

So there was a weird outlier on one of these shots. Keep in mind that each test is sampled by TWO pickups simultaenously, and so when the wind or some other unknown factor on rare occasion throws a weird spike, it can be discarded. Without the outlier removed the average was still a respectable 84.25. So this is a win, in a big way. Keep in mind the Mus averages 82 and 79 for the .22 and .30 Crowns respectively. And the post-peak sound is good on both tests as well. This makes the Gladius an improvement over the Mus across the board. The one area I'm a little iffy about is the post-peak sound, as the Gladius looks comparable to the Mus but despite tinkering with RMS I just don't have a good way to quantify it. It sure sounds good to the ear as well though.

So the Gladius is big, smaller than the Mus, but still quite big. And I wanted small. I started with the Levitas, and promptly rushed to size in a pursuit of ultimate silence. What about going in the opposite direction? After all, most people are willing to pay a serious price in terms of mechanical complexity and dollar cost to cut 6” off the length of their gun by running a bullpup. What good is all of that if you then stick a stonking great mod on the front to quiet it down? So in pursuit of tiny I wanted to see just how small I could go. Remember the TKO was basically a cigar in size and performed quite admirably. So I made a mod the size of a fat tube of chapstick, that weighs 20 grams, and in the spirit of the Levitas I named it the Brevitas. I'm not kidding about the size:

IMG_20191220_101825499.jpg

I would have made it skinnier too, but that is the OD of the Crown shroud and any skinnier would have just looked goofy. You might be asking how well such a teeny tiny mod could perform?

Brevitas Crown .22 – 185

Brevitas Crown .30 – 640

Brevitas VP30.png

Keep in mind that, with the shroud retracted, the Crown .30 meters at 733. Put another way, this more effective than extending the Crown's factory shroud, while being less than half the length. It sounds a little “whooshy,” kind of like a hollywood suppressor actually. This was just a crazy idea, and there is some tweaking I need to do to it. There are also some alternate configurations I want to test. I had no idea if this would work in any way shape or form, but I'm cautiously optimistic about the results of this test. I did cheat though and make the bores a little too tight relative to the projectile, so these numbers may creep up as I enlarge the bores and hopefully go back down as I test other improvements. All in all though, I think this is really cool and really unique. I'm not aware of any mod out there anywhere close to this tiny.

Finally, a gentleman has very kindly loaned me his AAA Slayer to build a mod for. The name is apt: is has a tendency to slay moderators.... particularly in interesting and unexpected ways. You'd expect it to just blow up tubes, and it hasn't done that a single time yet. Instead it has caused all manner of other interesting problems. I've been beavering away at this for some time now, but never had anything worthwhile to show for it until this most recent test.

Slayer .308 ~200 FPE – 608.5

So there are a lot of interesting things about the Slayer, too much to go into here. But one of them is that the tube ping is incredibly loud. You probably saw my previous post on the subject, and that peak is actually from tube ping not the uncorking event. Cool huh? I'm going to continue ruggedizing this moderator design, so this is not a final version, but so long as I'm at or below the air tube ping I'm happy. Unsurprisingly, this mod is all air-handling, there is no room for anything else. I'm doing it in a Gladius size tube to fit the general requirements of the rifle (like accessing the gauge) as the Mus is simply too large.

This was just a quick summary of whats cool I've been working on. Honestly there is just too much to write it all up, but I hope this was an interesting albeit long overdue update.


SALE! - Scalpeldashi

Silent Thunder Ordnance

Scalpeldashi 4 colors.jpg

Scalpeldashi, a popular product of ours, we all love them and all carry at least one. We’re changing our lineup for 2020 though, and so we’re putting all our traditional coated polymer scalpeldashi and sheaths on clearance, up to 50% off. Get ‘em while they last, because they will not be restocked!

Out of Office 12/23/19 to 12/27/19

Silent Thunder Ordnance

Happy holidays to everyone! We all will be out of the office from 12/23/19 to 12/27/19. During this time period we will not be able to process orders or respond to inquires, please accept our apologies. Service will resume as normal 12/30/19.

Airgun Moderator Design, Performance, and Development - Air Tube Ping; An Interesting Finding (part 13)

Silent Thunder Ordnance

gladius-slayer indicated.png

Catch the previous episode HERE.

Yes, I’m still here, and I’m still playing with moderators in my copious free time. I spent a lot of time playing with a new piece of technology, figuring it out, and some cool, interesting, and pretty unique things are on their way along with more testing. That is all for later though. Right now I want to talk about something very interesting I discovered regarding tube ping, namely that IT GETS LOUDER. Didn’t expect that? Don’t understand what I mean? Let me unpack.

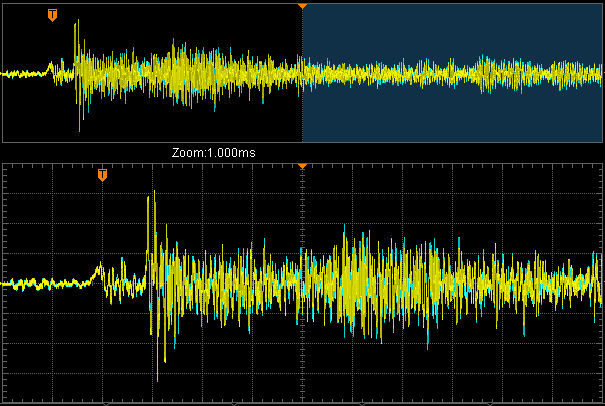
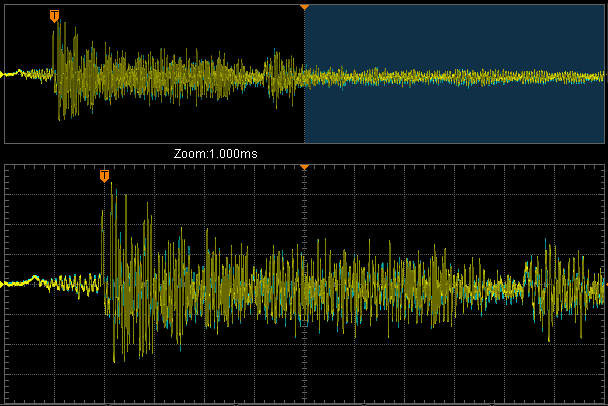
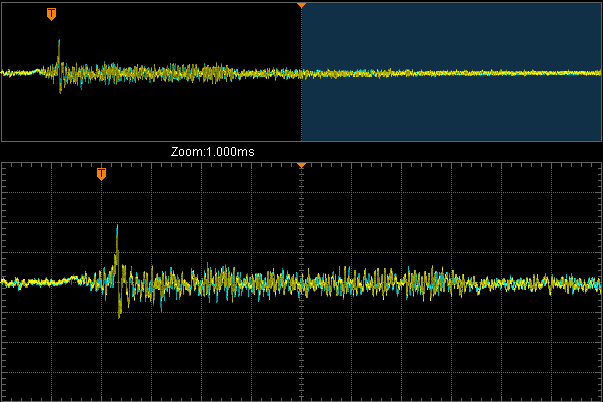
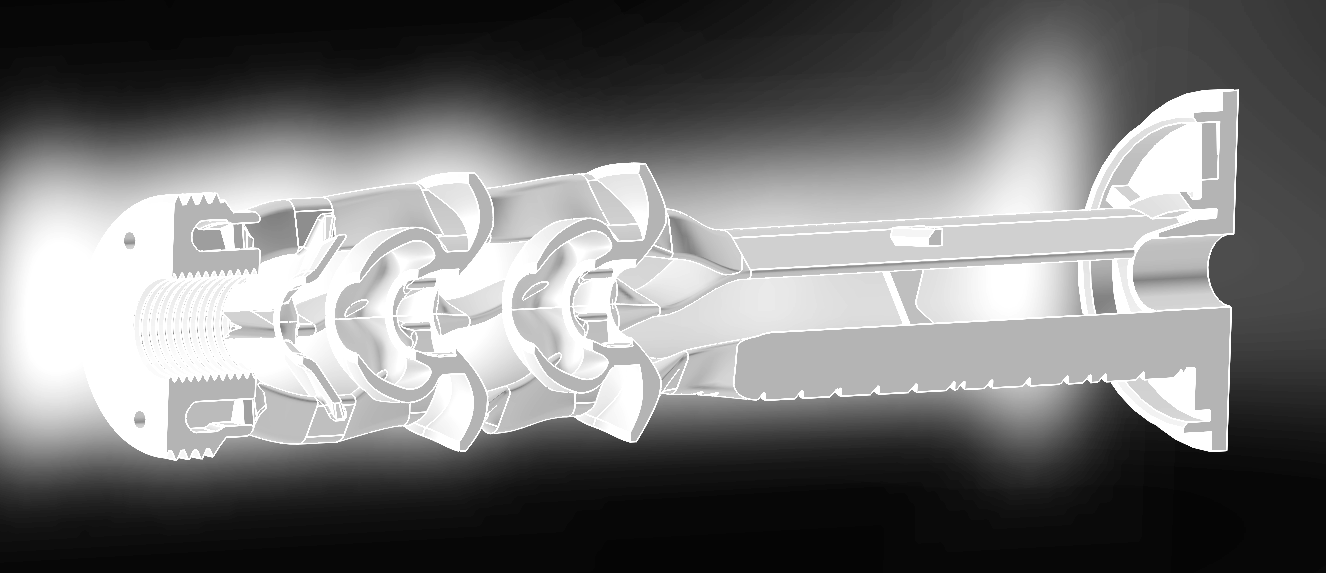
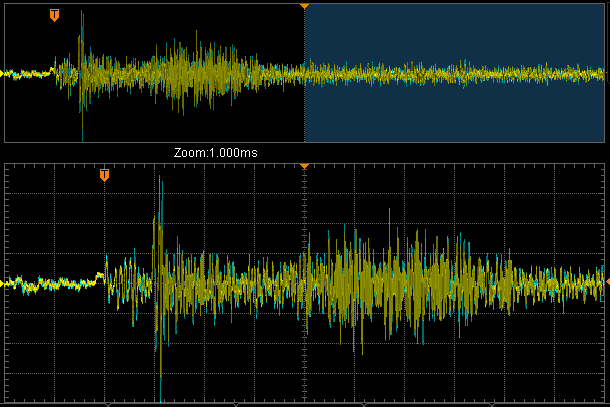
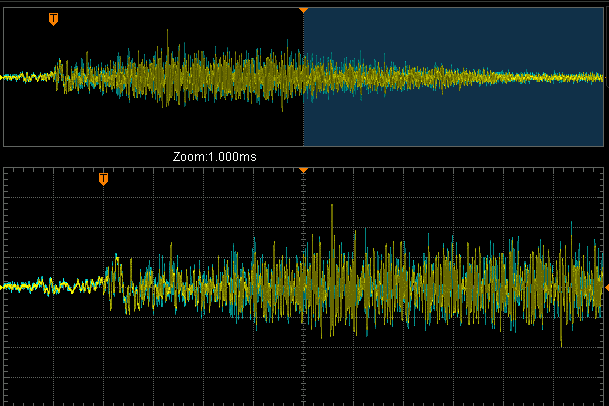
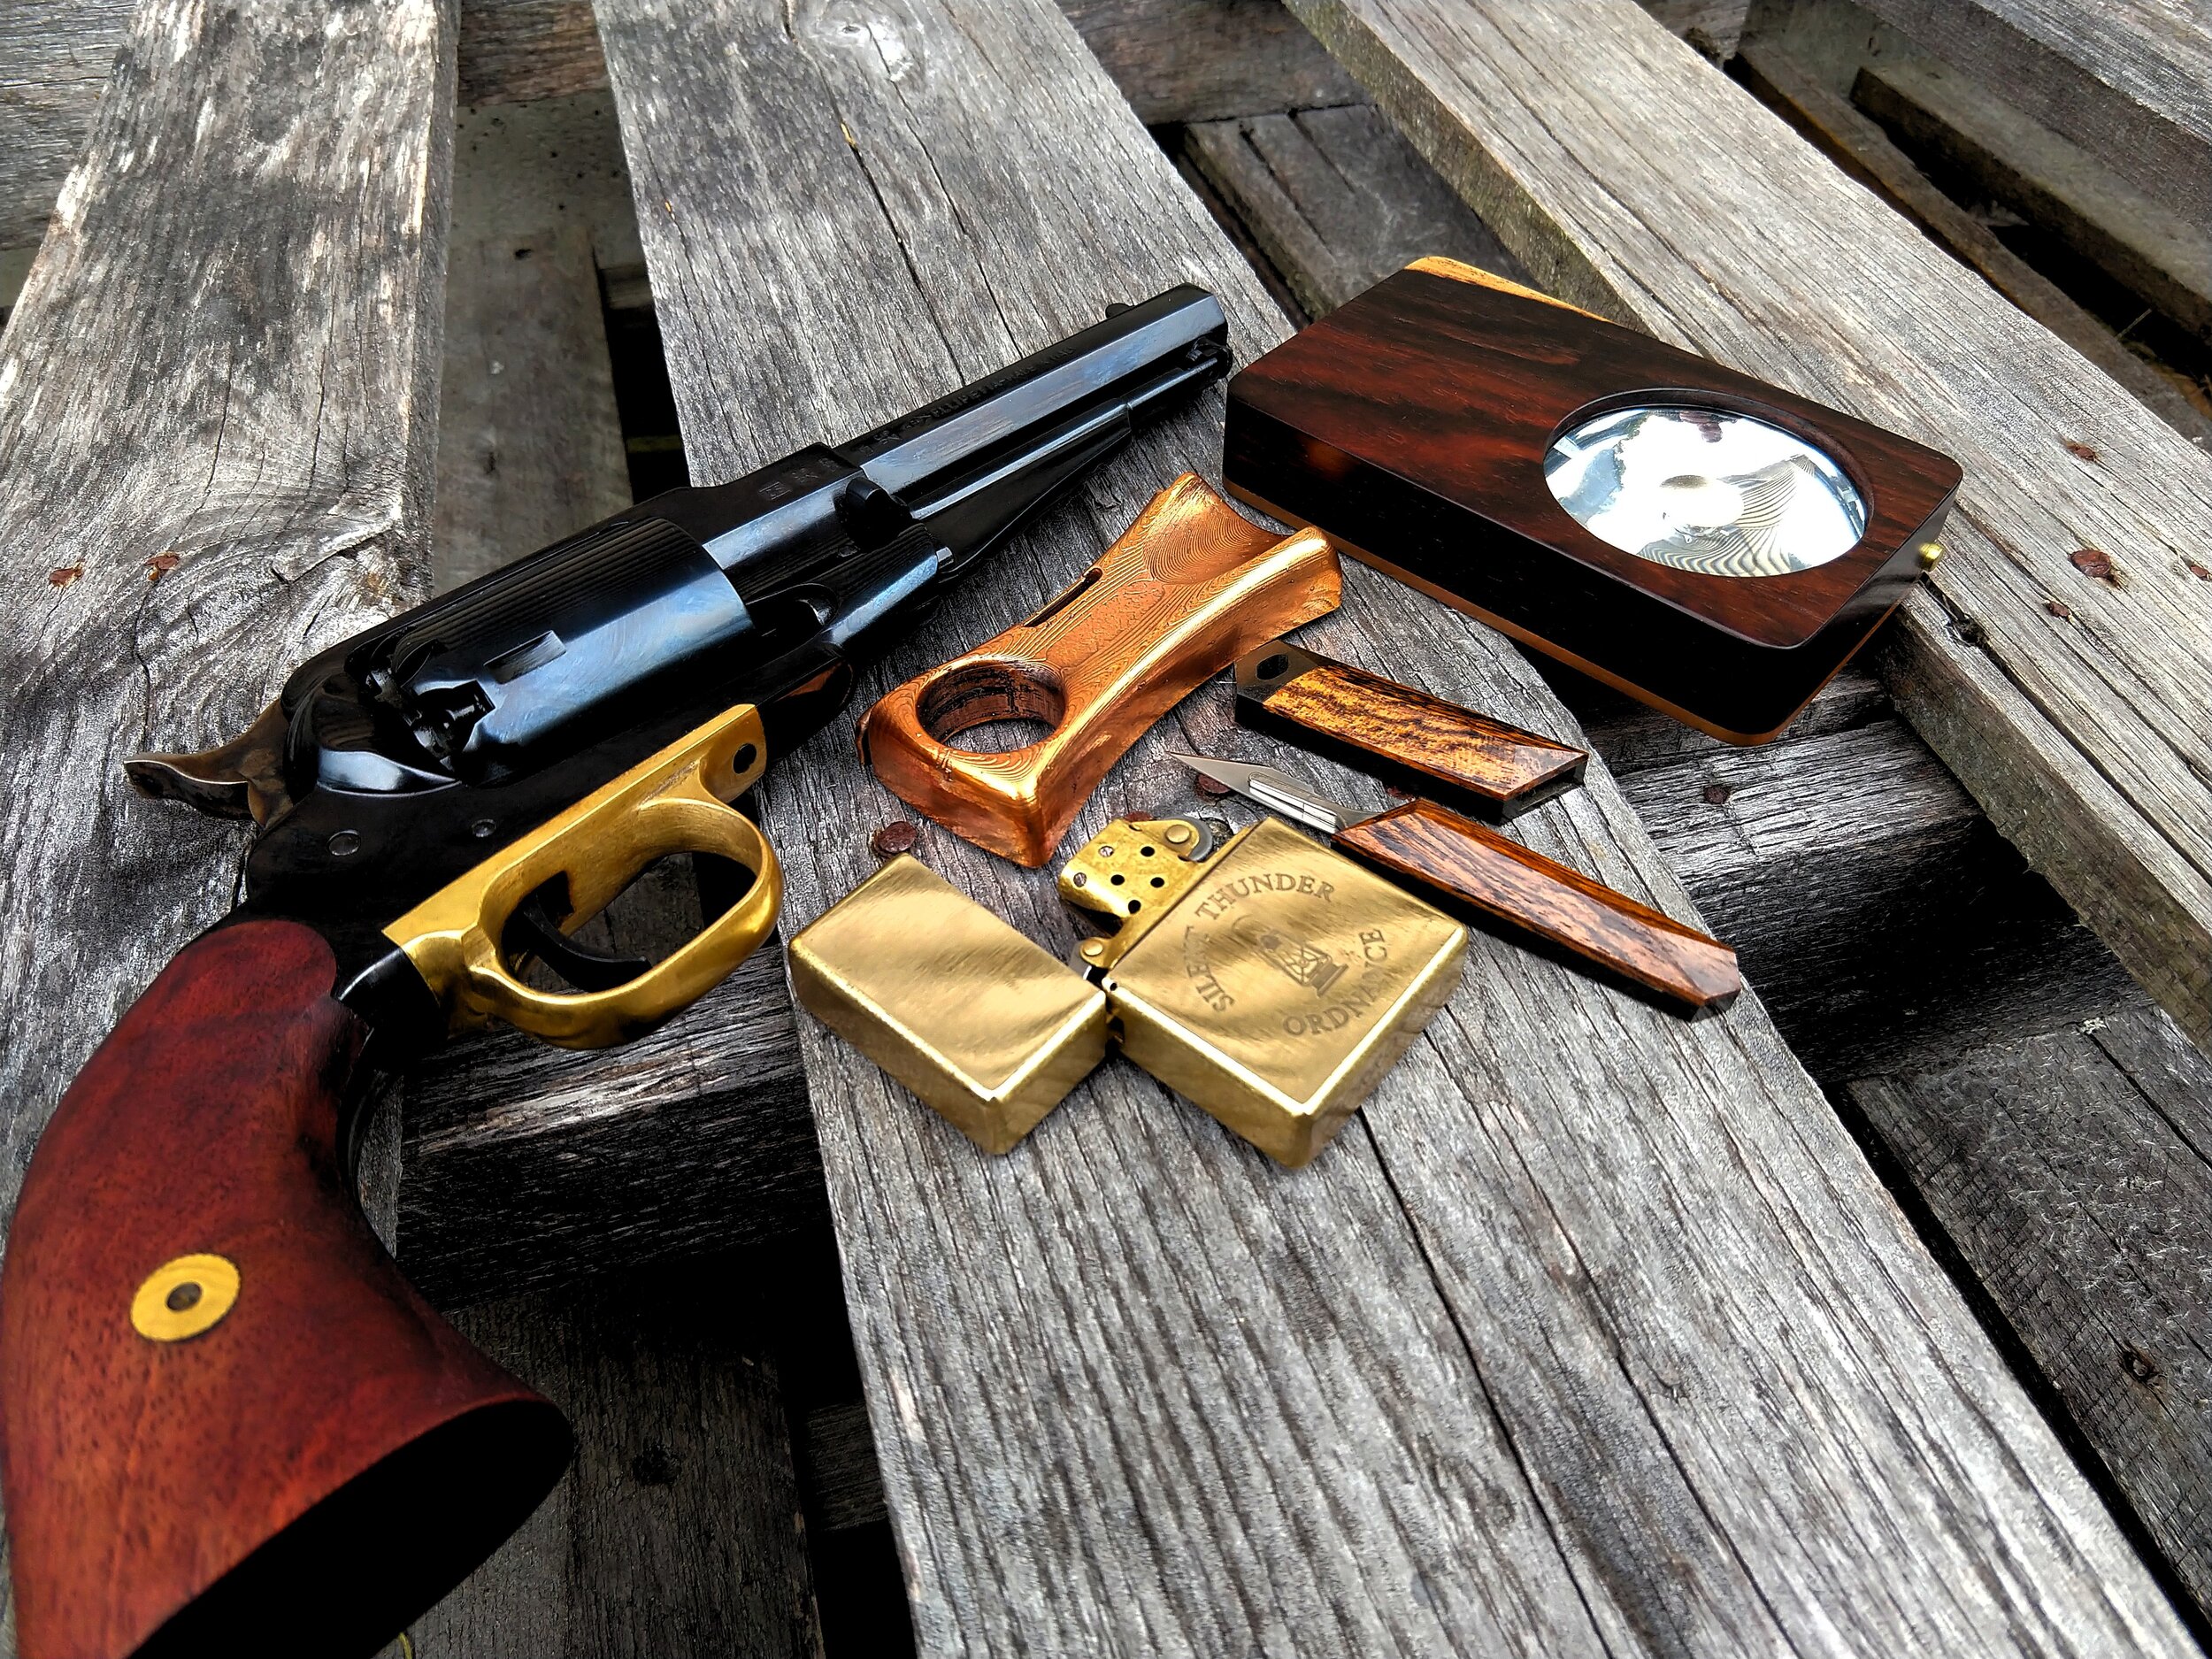
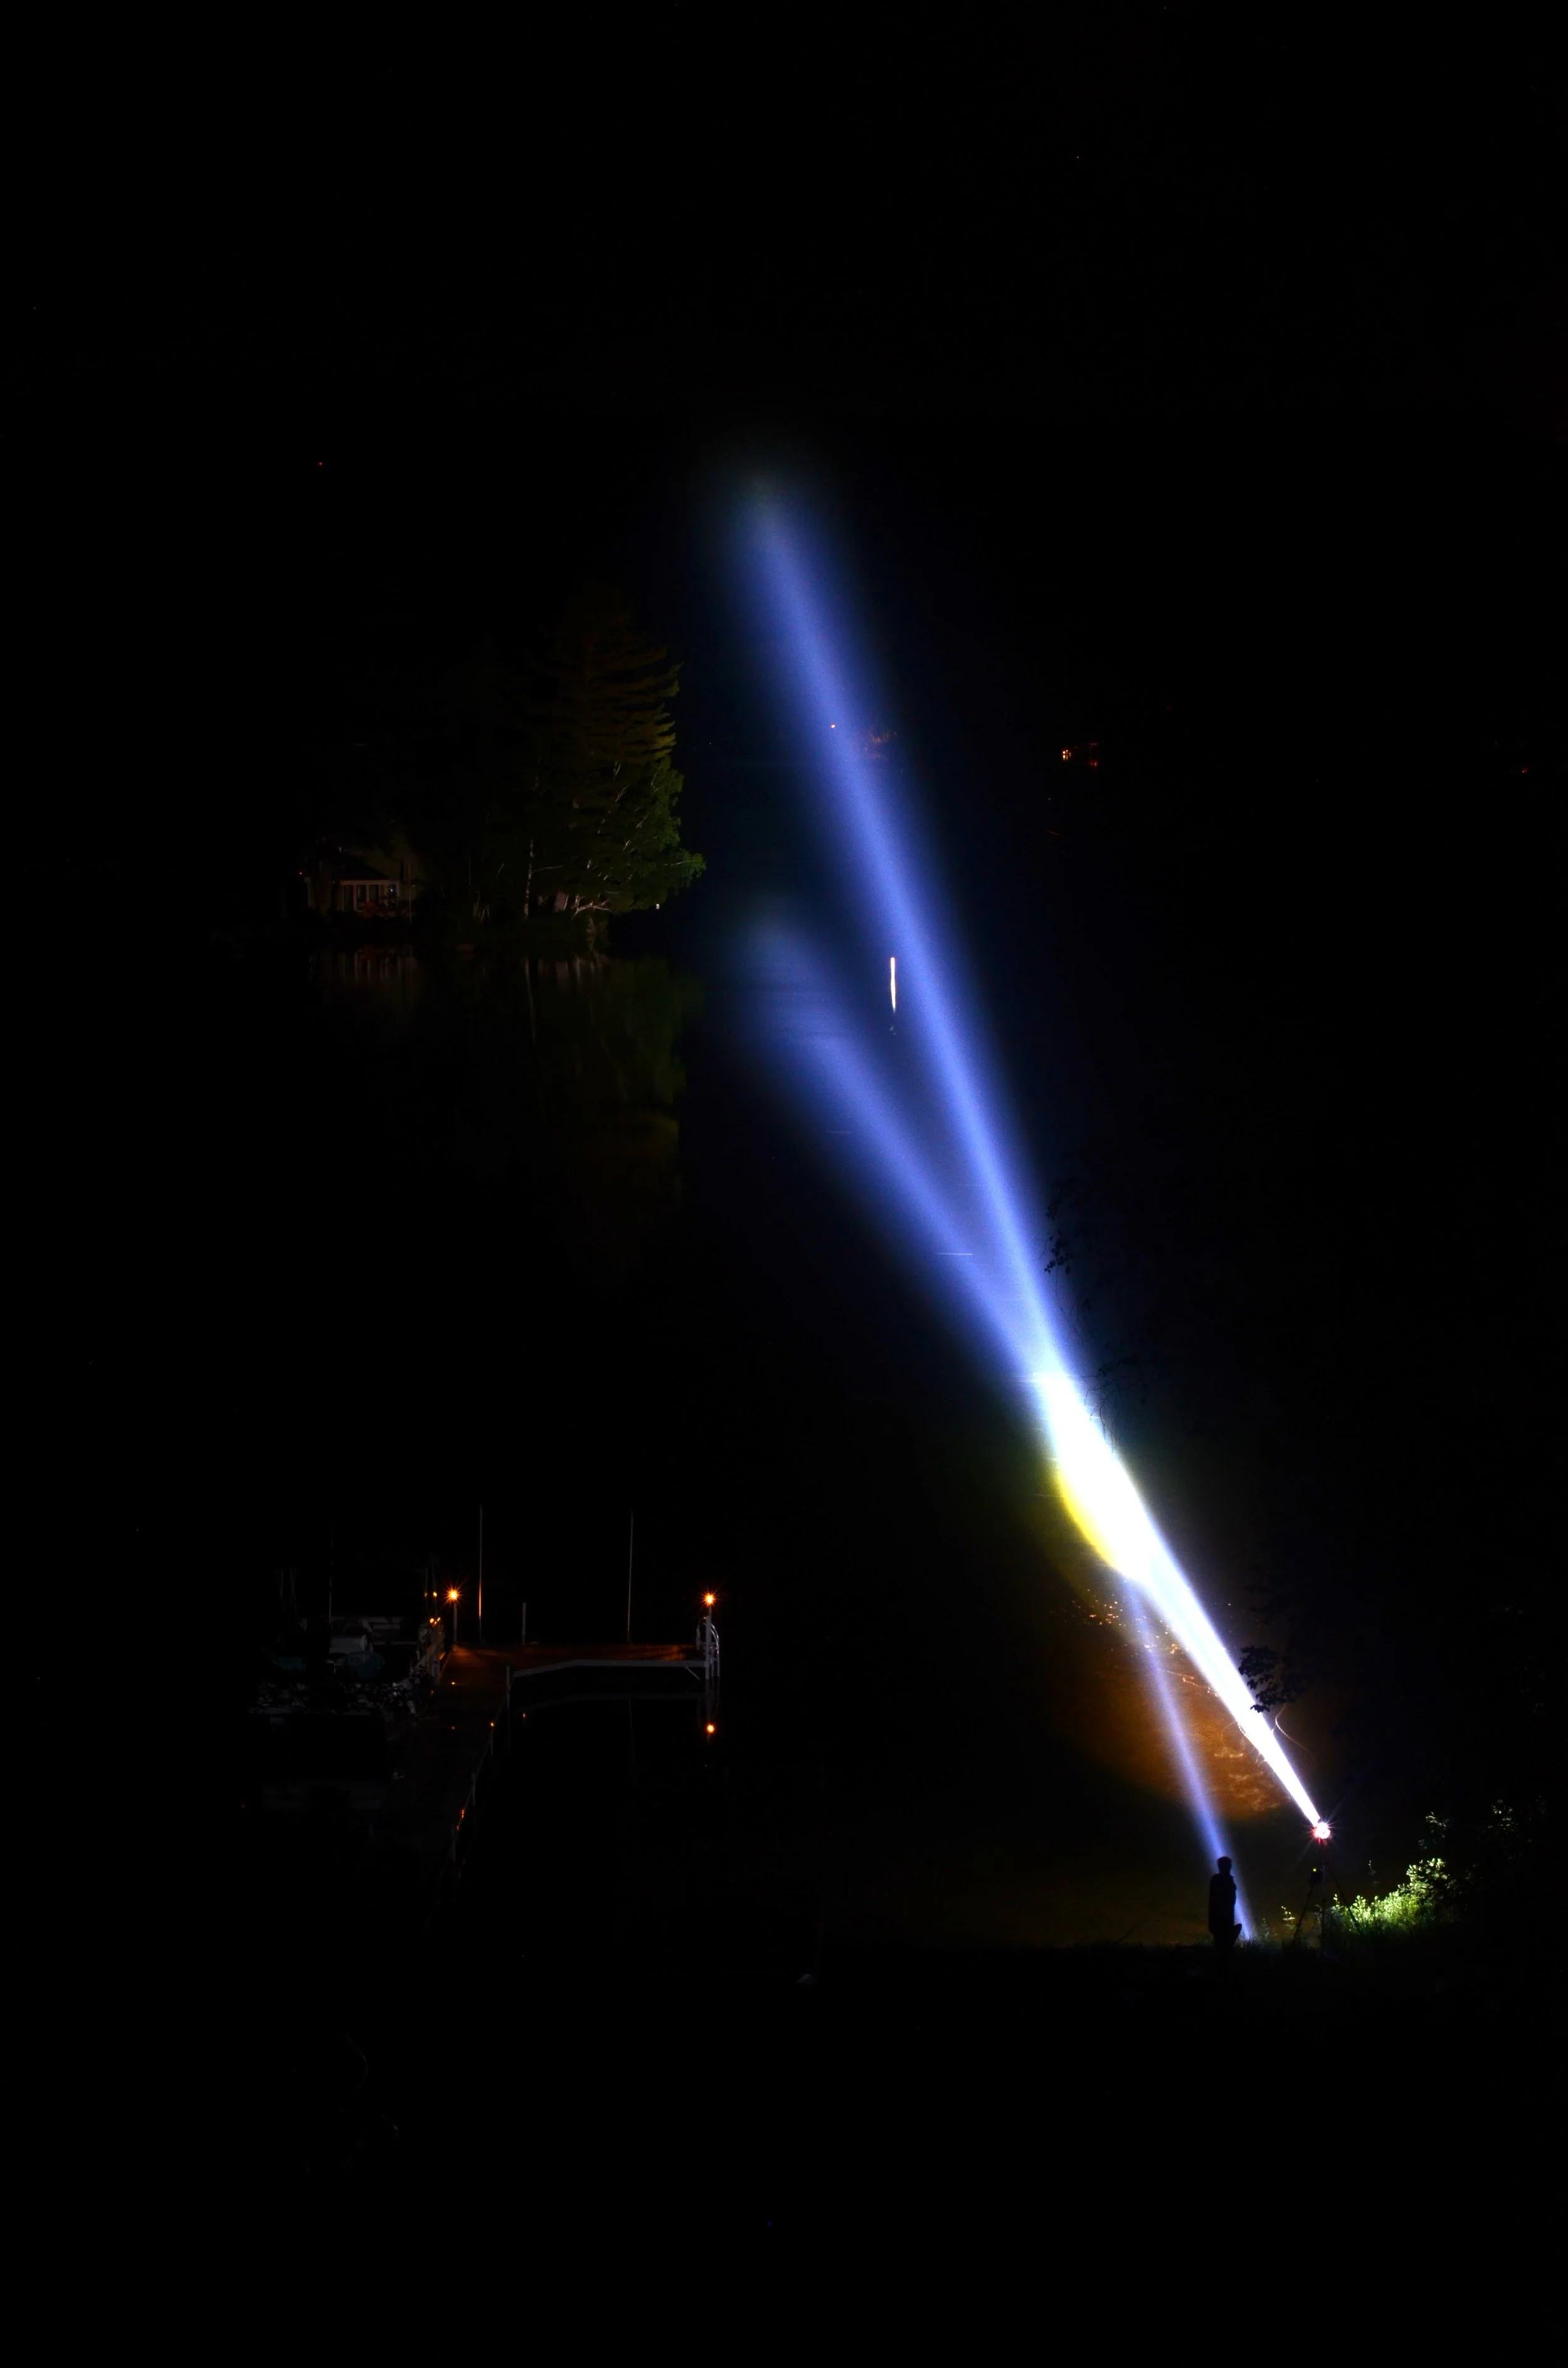
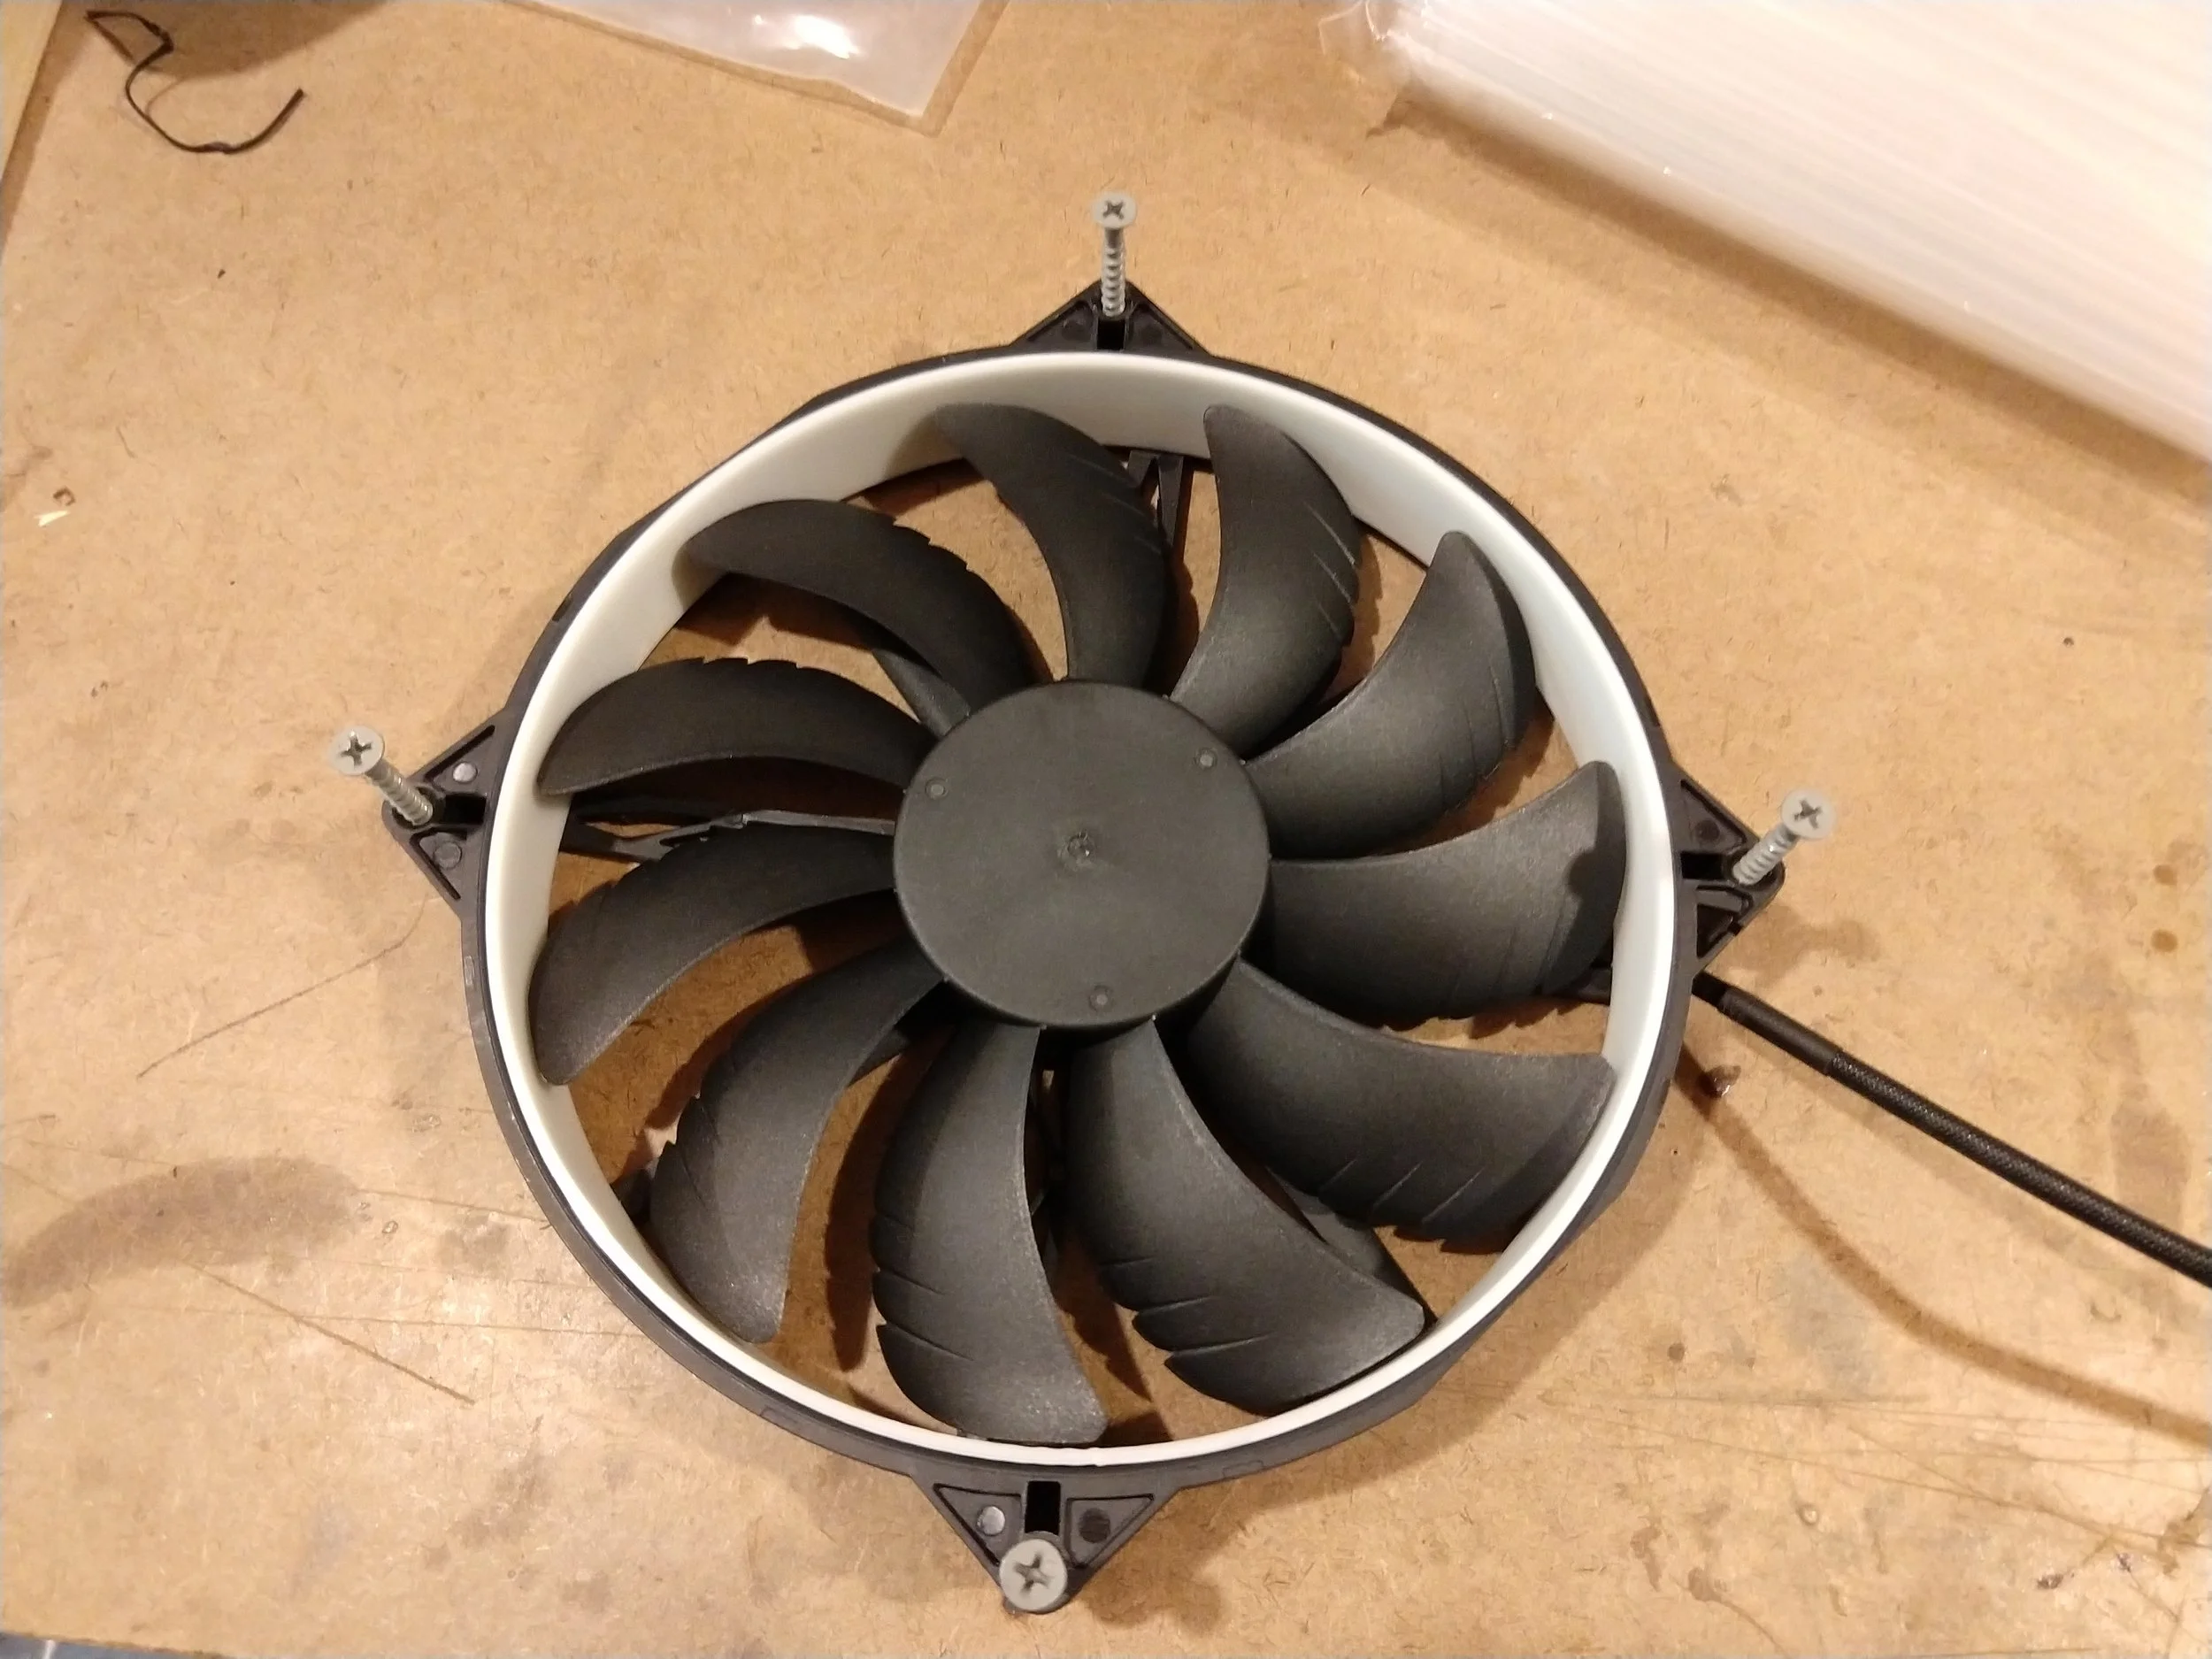
The above trace is a .308 American Air Arms Slayer. It is a powerful slug-throwing gun running about 200 foot pounds at the muzzle. It is unregulated, runs a tube, guzzles air, and runs some balanced valving witchcraft. All this means that the valve opening and closing events, as well as the total amount of air removed, are relatively violent events in the air tube. Unsurprisingly, this leaves the rifle with a very pronounced “ping” when it fires. Several months ago, I was approached by a gentleman who wanted me to develop a moderator for his Slayer. It seemed like a fun challenge at the time (spoiler alert, its been a pain in the tuchus), so I took him up on the offer. It has been a bit of a roller coaster of hope and failures, but I just finished testing a design which is quieter than the tube ping, and THAT is interesting.

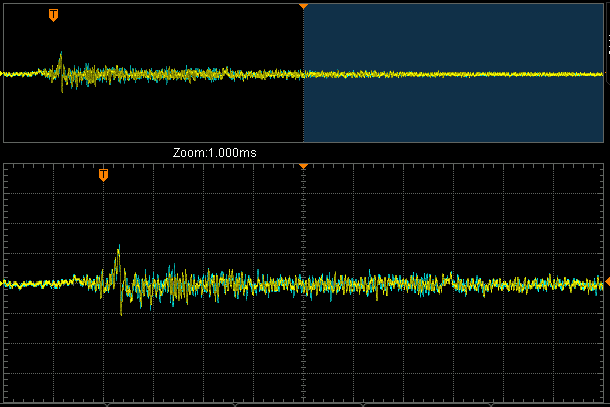
To be clear, I’m only pretty sure of all this, you can never been 100%, but looking at the timeline, other tests, so on and so forth it seems to be the only thing that makes sense. So, in the above trace highlighted in yellow, you can clearly see the “uncorking event,” that is to say the moment when the pellet exits the muzzle of the moderator. It is a bit messy here, because it is all mushed into the tube ping….. which clearly increases in amplitude over time. This might, on first blush, sound a little screwy. How, after all, could the tube ping get louder AFTER the most violent event (valve opening/closing)? If you think about it for a minute though, this actually starts to make sense. When the valve first opens, the air/sound in the tube won't be moving in a uniform wave. The air nearest the valve will expand substantially more than the air nearest the gauge. Similarly when the valve first closes, the air won’t all simultaneously stack up at that end of the tube in a pressure spike because it isn’t all going at the same speed. It takes a couple cycles back and forth for that air movement to coalesce into a uniform sound wave front and thereby reach peak amplitude/intensity. Then, obviously, hysteresis naturally damps it back down to zero over time, in this case a much longer time than was sampled. Look at that happen too. Initially the sound is messy, very messy (look at the area between the yellow highlighting and the teal highlighting), and it actually takes a little time for the wave to coalesce around its primary frequencies. As it does so, it increases in amplitude! I was COMPLETELY not expecting this, but now that I've found it, I thought I ought share it.

This naturally leads to some interesting ideas on the design of depingers; they don’t have to break up the wave front to function, they simply need to stop it from forming in the first place. This suggests entirely different avenues of design, some in the same vein as existing designs granted, but others completely novel.

Cool stuff eh?

Out of Office 11/28 - 12/1/19

Silent Thunder Ordnance

IMG_20191011_160749347EDITED.jpg

A very happy Thanksgiving to everyone! In observance of this holiday, and giving thanks to our friends and family, we all will all be out of the office from 11/28 to 12/1/19. During this time period we will not be able to process orders or respond to inquires. As a small thank you, we’re offering a 10% discount, site-wide, just enter the code “9ULZASI” at checkout.

Project - Scope Throw Lever

Silent Thunder Ordnance

IMG_20191022_153625322EDITED.jpg

The concept is far from new: magnification rings on scopes can be stiff to actuate, thus a throw lever to increase the mechanical advantage and grip is an obvious accessory.

A small objective 1-6x scope I think is underappreciated in the realm of airgunning. It is well suited for close range hunting/shooting, but still has the magnification to reach out for some longer shots. It’d be a great fit on an FX Dreamline Compact for example, or many of the popular super compact bullpups. In this case we’re looking at the AIM Sports Alpha 6 1-6x24 30mm Riflescope. It is a very nice little optic for an airgun and <100 yard work on varmints of various flavors, and it has a bunch of other nice little features. It’d be an especially good fit on an Edgun Leshiy though, where the small (24mm) primary objective would allow it to clear the somewhat inelegant upward bulge of the Leshiy’s integral shroud without sacrificing size on the ocular. It has a handful of other nice little features as well. But this blog post isn’t meant to be a scope review.

And so, needing a throw lever for this scope and with no obvious commercial option, we set about making one. And if you’re going to build something, why not improve it, add a bit of flair? In this case we made the throw lever and ring from 20% carbon fiber reinforced nylon, a fantastic material and way overkill durability-wise, for this application. We also added two glow elements though. These are only visible from behind the scope, so they won’t alert whatever you’re hunting, but mean at night it is easy to locate your throw lever/know your magnification.

Custom throw lever for a clever little scope? Done!

IMG_20191022_153517062EDITED.jpg

Put a trit on it - Spyderco Autonomy 2

Silent Thunder Ordnance

Tritium vial holding GITD insert for a Spyderco Autonomy 2. Seen here with our arc lighter

Tritium vial holding GITD insert for a Spyderco Autonomy 2. Seen here with our arc lighter

As part of an ongoing project to get tritium on literally everything, we embarked on a (short) journey to get one on the Spyderco Autonomy 2. Not satisfied to place it just anywhere though, we went with the fire button, making its location easy to find and the entire knife to orient even in the dark. Holding the trit is a GITD insert, for double the glow.

Project - Borescope down a Smooth Twist X barrel

Silent Thunder Ordnance

First, an obligatory safety message: airguns are dangerous, and should be treated with the same safe handling practices as firearms. Do not replicate what was seen/done in the above video. Please note the rifle was degassed for this, for safety reasons. Even still, this violates several best handling practices and should not be copied.

So what exactly are you seeing here? Well, this is a .30 caliber Smooth Twist X barrel on an FX Crown. Note that the camera starts rotated approximately 90 degrees clockwise from vertical, and so the brass transfer port actually appears on the right hand side.

0:00 First you see the bolt probe, slowly being retracted, and the magazine indexing a pellet. Note how rapid/violent that is. It really chucks that pellet sideways surprisingly forcefully. No wonder groups shrink when pellets are single loaded as opposed to magazine fed.

0:13 The pellet starts to be fed forward. Again keep in mind the camera’s rotated perspective. The pellet slowly noses its way forward.

0:21 The pellet visibly engages the rifling here, showing slight deformation at the points. Notably, this is key to good accuracy on most airguns and firearms, firing the projectile before it has engaged the leade will tend to result in poor accuracy.

0:36 We’re just examining the bore here. Note this barrel has not been cleaned at all recently, so lead buildup should represent normal use. The majority of the bore appears quite smooth, although far from flawless as there are clear tool marks of some sort at various points. Notable is the leading of the lands, while the grooves appear remarkably untouched.

1:07 Now we’re at the choke. I would recommend you pause the video here, click the little gear in the bottom right hand corner, and set the playback speed to 0.25 (1/4 normal speed) and watch the whole thing carefully, potentially multiple times. It is VERY interesting. Its significance is difficult to fully discern, but the leading certainly suggests the pellet goes from riding the lands to being constrained by the entire bore in a very short distance. There is also, at least the appearance, of the lands getting wider toward the muzzle within the choke.

1:14 Out of the bore and into the liner system. Visible here is the liner retention tubular bolt and the inside of the internal shroud brake.

So what all this means is very much subject to interpretation. There is a great deal of speculation regarding the Smooth Twist and Smooth Twist X systems, how they are similar to and different from conventional rifling, etc. So here it is, a solid video showing a peek behind the curtain of what exactly is in the bore. Hopefully it is interesting, if not otherwise useful.

Light of Xiuhtecuhtli - Teaser

Silent Thunder Ordnance

Just a little teaser of the LoX as we work on it here. Long exposure photography makes it easy to “cheat” beamshots, a 5 minute exposure in an area with little light pollution will make even a 5$ zoomie look impressive, however video is another matter entirely. The necessary frame rate and ISO make it much clearer if you’re cheating the shot. In this case, this 9 second clip was filmed on a potato quality cell phone camera. In short, yes, it is just that bright.

Project - Scalpeldashi Pocket Clip

Silent Thunder Ordnance

Chameleon skin scalpeldashi w/ carbon fiber sheath and titanium pocket clip

Chameleon skin scalpeldashi w/ carbon fiber sheath and titanium pocket clip

It is all too common a refrain in the flashlight world “well that is great, but does it have a pocket clip?” We got a customer request for exactly that, rather than carrying it as a neck-knife or keychain-knife, they wanted a corner-of-the-pocket carry system.

There are lots of different types of clips possible, but in this case we went with a 6Al4V titanium deep carry pocket clip and stainless hardware. It carries light and out of the way in the pocket, it is exceptionally convenient, and looks good too. It all worked out rather smashingly.

Chameleon skin scalpeldashi w/ carbon fiber sheath and titanium pocket clip

Chameleon skin scalpeldashi w/ carbon fiber sheath and titanium pocket clip

Product Spotlight - Scalpeldashi

Silent Thunder Ordnance

Bocote Scalpeldashi

Bocote Scalpeldashi

Just how sharp is a scalpeldashi? Really the question is more along the lines of: just how sharp is a surgical scalpel blade? Very sharp is unsatisfying, so we embarked on a brief journey to vault a couple common cutting tests namely hair, printer paper, and newsprint. For this testing we used exclusively Swann Morton #10A blades, the blades we supply on our dashi.

Printer paper, this one is all too common. There are some tricks here though. The first is that paper has a “grain,” that is to say it cuts more easily in one direction than another. So when watching people’s tests here, look for ones which change direction, either rotating the sheet of paper or starting at one angle and shifting to another as the cuts progress. The next trick/challenge is technique. There is a technique to cutting printer paper that makes it easier. We know this from conversations with people such as Cliff Stamp who demonstrate this. Unfortunately we have no such talent, so if this works, it is all down to the blade. Finally is sharpening technique. In this case no technique is applied, the blades are of course virgin fresh out of the package, however in general the best edges for cutting paper are very sharp but applied on a coarse stone to leave a “toothy” edge which can keep the paper from slipping away. Cutting then at an angle and drawing the edge through makes cuts easier. That is two more strikes against this blade style passing this test, as the blade is very short and the edge itself is highly polished and refined. The paper used for this test was Staples 20 pound copy paper.

Bocote scalpeldashi shown cutting printer paper (Swann Morton #10A blade)

Bocote scalpeldashi shown cutting printer paper (Swann Morton #10A blade)

Of course, since you can probably see these gifs as you scroll, you already knew the answer before getting here. The lack of blade length made this slightly more challenging, mostly because cuts had to be very precise. Too deep or shallow and the cutting edge slips off the paper ruining the cut. It worked great though.

Next up is newsprint/thin glossy magazine print. This is apparently different/harder to cut than printer paper? Same challenges apply, but now to super super thin flexible paper. This specific test was done on a semi-gloss Cabelas’ flyer. The flexibility of the paper definitely made it more of a challenge to hold and maintain consistent depth on the blade. Largely though, it was about the same as printer paper which is to say no problem.

Bocote scalpeldashi seen cutting newsprint (Swann Morton #10A blade)

Bocote scalpeldashi seen cutting newsprint (Swann Morton #10A blade)

Finally, there is hair. Shaving is trivial with one of these blades, but shaving sharp knives are a dime a dozen anyway so that is no great challenge nor anything special. The real trick is whittling a hair. This is where things get a little more prickly. All the men of STO have short hair, hair too short to test. The ladies available and willing to donate to the cause have fine blonde hair, which doesn’t show up on camera. A dog, owned by one of our partners, has just the finest softest imaginable hair, which both doesn’t show up on camera and is too fine to be cut. There is a third option for hair sourcing from men with short hair, and those hairs are easily whittled by one of these scalpel blades as it turns out, but they aren’t *cough* suitable for a family friendly venue as such. So this one you’ll just have to take our word for, the scalpel blades will whittle some human hairs.

And that is a wrap, a little almost-science applied to some common sharpness tests to demonstrate just how sharp one of our scalpeldashi can be.

Two one-off scalpeldashi showing their strontium aluminate powered glow-in-the-dark elements

Two one-off scalpeldashi showing their strontium aluminate powered glow-in-the-dark elements

Light of Xiuhtecuhtli - Update

Silent Thunder Ordnance

The Light of Xiuhtecuhtli, or LoX, illuminating a mountain about 4.3 miles away, despite first having the beam reflected off the surface of a lake. To be fair, this isn’t a huge accomplishment, as at this many candela the LoX is actually rated for _…

The Light of Xiuhtecuhtli, or LoX, illuminating a mountain about 4.3 miles away, despite first having the beam reflected off the surface of a lake. To be fair, this isn’t a huge accomplishment, as at this many candela the LoX is actually rated for ______ ANSI throw distance.

You didn’t think we’d forgotten about the Light of Xiuhtecuhtli, the most powerful flashlight in the world, did you?

A big thank you to everyone who reached out after reading our initial announcement to provide design input, or simply to be put on the inquiry list. This has shaped our plans for the LoX regarding design direction and of course price. To be clear though, we’re not going to HMG Sturmgewehr this project, we have not and will not take a penny until the production design is complete. If you’re interested in adding your name to the list though, please reach out via the contact form in the top right hand corner. When the light is ready, everyone on said list will be given an opportunity to purchase one at a discounted price.

Light painting with the LoX. This was a 30 second exposure at F11, giving just the briefest of moments to wave the light back and forth across the landscape to “paint” it with light. Note the point is a quarter mile away, and the far side of the lak…

Light painting with the LoX. This was a 30 second exposure at F11, giving just the briefest of moments to wave the light back and forth across the landscape to “paint” it with light. Note the point is a quarter mile away, and the far side of the lake is a mile away. More than a few insects were roasted as part of this process.

So where do things stand? Well we think we are about 90% of the way to the final electrical and optical architecture. Test mule specifications stand at 54 million candela (54,000Kcd which roughly converts to 54,000,000 lux@1 meter. There are severe limitations to measuring at 1 meter though, read our Test Protocols page to understand why.) and about 6,000 lumens.

The process from here is primarily about converting this light into something as beautiful as it is exceptional. Much like we’ve done with the optical design, we have every intention of taking our time and ensuring every last little detail is just the way we want it.

Just a few of the evening’s casualties. Note this is just a rough test mule for the overall architecture of the light to test the critical performance aspects, thus the hodgepodge of parts, it does not in any way represent the style choices of the f…

Just a few of the evening’s casualties. Note this is just a rough test mule for the overall architecture of the light to test the critical performance aspects, thus the hodgepodge of parts, it does not in any way represent the style choices of the final product.

Testing this light most recently revealed something somewhat unexpected: this light is an insect killer. The beam is so intense, so powerful, insects are not only drawn to it from miles around, they’re killed simply by flying through it. It was a calm night when we were doing photography, and you could see on the lake surface drops, like rain, beneath the beam of felled insects. All lights will attract insects, and some of our other lights are powerful enough to harm them if they fly close, but we’ve never seen the likes of this before. A simply inestimable number of insects falling out of the sky and into the water as far away as we could see. And not just small insects, many of them are quite large, some as large as your fist. The above photo was taken hastily with a cell phone, we didn’t realize the bezel was full of insects until we’d carried the light back and were about to pack it up. Surely there must have been more before we jostled/carried the light around?

Just something to keep in mind regarding this light, these power levels mean it is not a toy and should be treated with care and respect.

Project - Silent Laminar Flow Fan

Silent Thunder Ordnance

IMG_20190707_162045659.jpg

I'm not the kind of guy to spend $500 on a blow job at Walmart..... even if it's from a guy named James Dyson.

The issue with the Dyson fans is that they’re pretty inefficient, loud, and not what you’d call cheap. So if you want to get blown in your sleep without disturbing your significant other, a better solution will be required. This project was embarked on with the explicit goals of being:

  • Silent (won’t bother you or your SO while sleeping)

  • Ultra-low energy consumption (remember ultimately the point of this is to cool you off, so a fan which eats a hundred watts or more may feel cool to sit in front of, but is ultimately generating a fair bit of heat)

  • Focused and smooth air (so it can blow on you, but not your SO who doesn’t like it, again minimal disruption. We’re going for a gentle Hawaiian breeze here.)

  • Inexpensive (it is a total experiment, so starting with a couple hundred dollars in parts just to see if something is viable stinks!)

  • Adjustable for all angles (so you can aim it EXACTLY where you want it)

So objectives set, how to go about it? To solve this, we’re going for a quick and dirty project here, completed in a day thanks to rapid prototyping. Best to start with a base. Designing impellers and fans is a bit of a process, so lets go with something off-the-shelf. Computer fans are notoriously inexpensive, efficient, reliable, and well documented regarding their performance and noise level. I went with a Thermaltake 200mm case fan, two of them actually, for all of the above reasons. The exact model number is CL-F015-PL20BL-A.

And if you wanted silent air at a cheap price alone, you could very easily just build a mount for these and call it good. But bladed fans deliver their air, not continuously, but in pulses. They also tend to spread their air out quite a lot, producing turbulent flow. The optimal would be, not turbulent, but laminar flow. So the next obvious step was to set about building an integrated laminar flow head w/ mount for the Thermaltake fan.

Thanks to the miracle of rapid-prototyping, this head was ripped out quickly and fit first try. Note the dovetail at the bottom. Tripod ball heads will point in all directions, and cheap ones are available for a song, so an Arca Swiss clamp seemed like an obvious choice rather than trying to fabricobble some sort of head. I should note though that, if you had one kicking around, one of those old school adjustable desk lamps with the coil springs on the side would also work well for this application, concealing the wires as well.

So at this point you might be saying something along the lines of “great, but that isn’t laminar flow, that is just some vague stumpy ducting. What gives?” Right you are, in the famous words of Brittney Spears though “I’ve got a plan.”

IMG_20190706_204224782.jpg

So you want a whole bunch of smooth parallel thin walled tubes. What better way to kill two birds with one stone than to use soda straws? I know I’m doing my part to help us use the 6 bajillion straws Americans allegedly consume per year. (it is approximately 500 straws per fan, if you were wondering)

IMG_20190706_205542853.jpg

Having shoved all the straws together, I encountered my first problem: the relatively short duct required the straws shoved in and compressed rather forcefully. This meant the friction fit holds them in place, just as I had intended, however it also means they have a certain flare outward at the top. Not good. The other problem, running the fan, is that apparently these Thermaltake fans are absolutely piss poor at positive pressure applications, even ones as mild as this.

IMG_20190707_144707945.jpg

The flare at the top was an easy fix, just a retaining ring can be press fit around the sraws and nicely constrains them. Problem solved.

The pricklier problem of the thermaltake fans has to do with blade velocity, blade geometry, and ductwork. I could run the fans harder, I could design new blades, but the low hanging fruit is to clear the MASSIVE almost 3mm gap between the blade tips and the fans. A surprising amount of air can be felt exiting the intake side of the fan through precisely this gap.

This one took me two tries to get toleranced correctly, and even still there is about 0.5mm of under-utilized space so I could hit it a third time for even more performance. Allegedly the increase in performance is exponential as the blade tips approach the ducting. This, for now though, mostly resolved the problem.

IMG_20190707_162057440.jpg

So how does it work you might be asking? Well, as far as flow goes an inexpensive (read as inaccurate) anemometer I had kicking around measures the output as about 3.5mph at the output (straw) side. Compare that to the 5mph one of these fans, unmodified, produces on the same (again, innacurate) anemometer. Perhaps more importantly is the subjective impression, which is that even 7 feet away there is still a distinct gentle and very smooth feeling breeze. The whole assembly runs in almost complete silence.

IMG_20190708_141811949.jpg

The other question is, of course, one of power consumption. Looks like two of these fans running together is 6.7 watts, or about half one of those crappy “save the world” LED lightbulbs which outputs an advertised 60 lumens and you almost believe them. So that is pretty good.

So there it is, cheap, quick, smooth air wafted silently from any angle all for less power than the vampire draw of all those phone chargers you have plugged in all around the house. In the immortal words of George Bush “mission accomplished!”

IMG_20190707_162045659.jpg