Contact Us

Use the form on the right to contact us.

We offer extreme-performance custom flashlights, EDC, and accessories. Home of the world's most powerful production LED thrower with 3 kilometers ANSI throw. 

IMG_20180919_152657237EDITED.jpg

Blog

Keep up with the latest sales, discounts, news, product releases, and projects here on our blog. 

Airgun Moderator Design, Performance, and Development - Failure Analysis and Flow Factor (part 16)

Silent Thunder Ordnance

Catch the previous episode HERE.

So far, of the moderators allowed out into the wild, two have come back with catastrophic failures. Lets break down these failures, why they occurred, and how they can be prevented.

levitas fail helium.JPG

The first was over a year ago, one of the first 1/2UNF revs. of the Levitas ever allowed out into the wild. The rifle it was put on was a power setup which used, not air, but helium to maximize output. Helium, for those unaware, has lower molecular mass and a higher speed of sound than air*, resulting in more efficient propulsion; it is a better gas for producing power. The moderator failed around the edges of the front cap, leaving the core itself intact. This rifle was not suitable for the small standard flow Levitas, however the failure at that point showed a weakness in the design. Cores are 3D printed. While the wall thickness was sufficient there in the original design, front and rear faces were trued up on the lathe to ensure concentricity of the moderator. That skim cut had thinned the edges of the front cap enough that it became a failure point. The solution was threefold. First, thicken the front cap. Second, rib the front cap to provide additional strength and rigidity without occupying as much volume. Third, suggest that this was not the right moderator for this power level. We’ll get to the specifics of point three further below.

*CORRECTION A reader wrote in with a correction, thank you! Previously this read as “viscosity and speed of sound,” the viscosity element of which is very likely incorrect or at bare minimum is not a significant factor. In summary, at essentially atmospheric temperatures and pressures, helium has a slightly higher viscosity than air or nitrogen. Under the operating conditions found in PCP this likely remains, although I’m unable to find a citation for it. More information about the use of helium as a propellant can be found here: https://en.wikipedia.org/wiki/Light-gas_gun More information on the far-from-straightforward physics on the viscosity of gasses at varying temperatures and pressures can be found here: https://physics.info/viscosity/

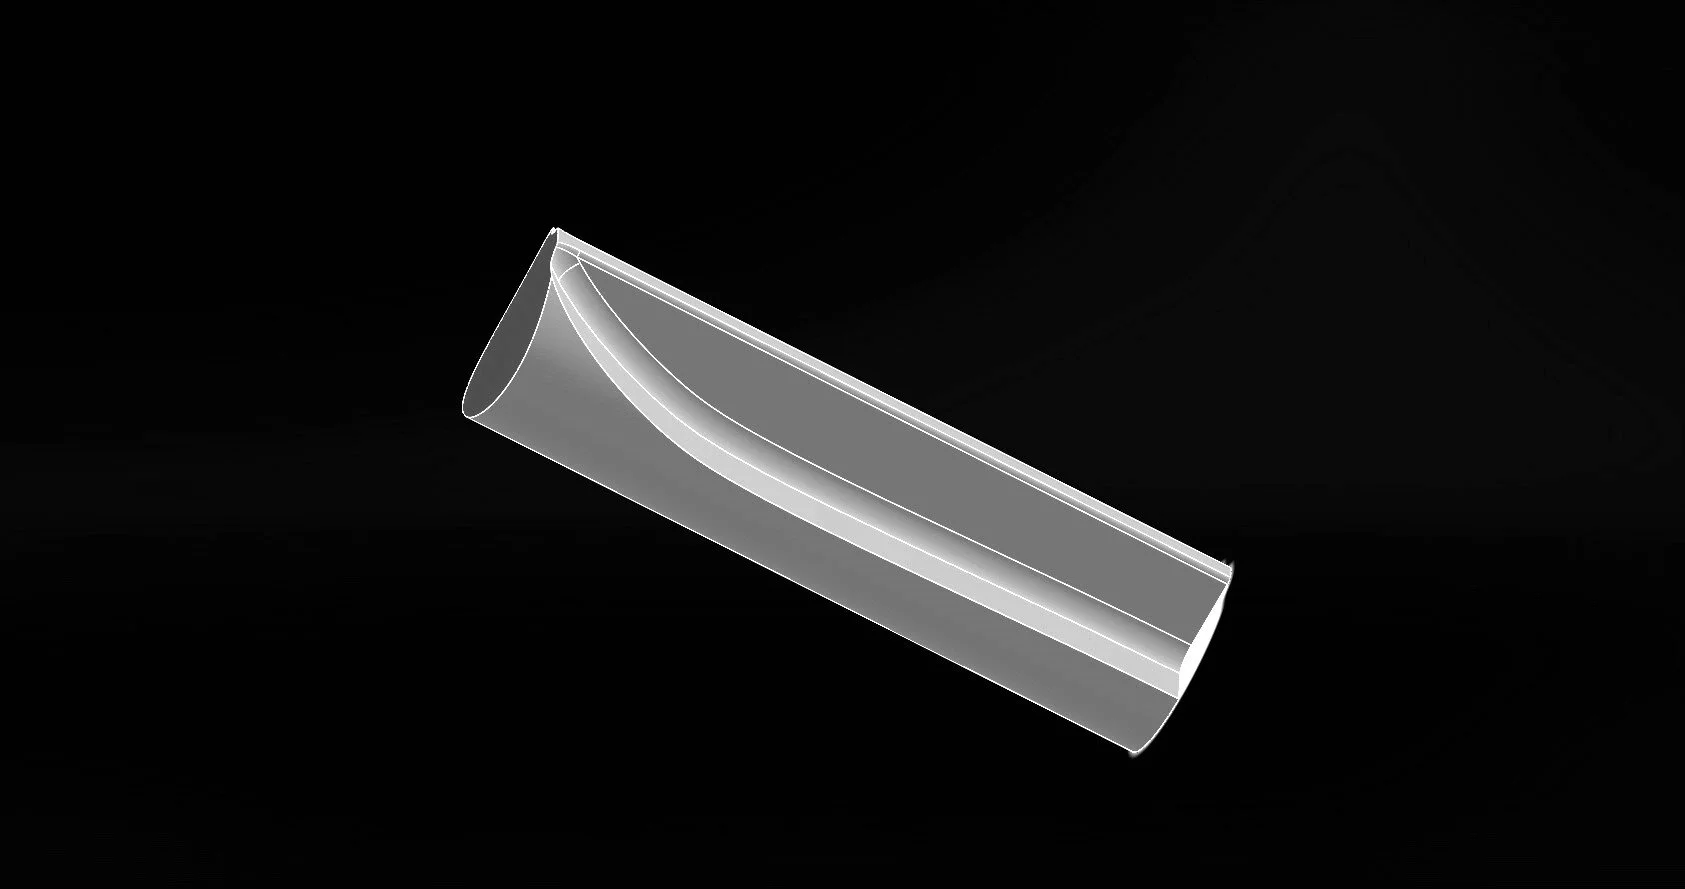
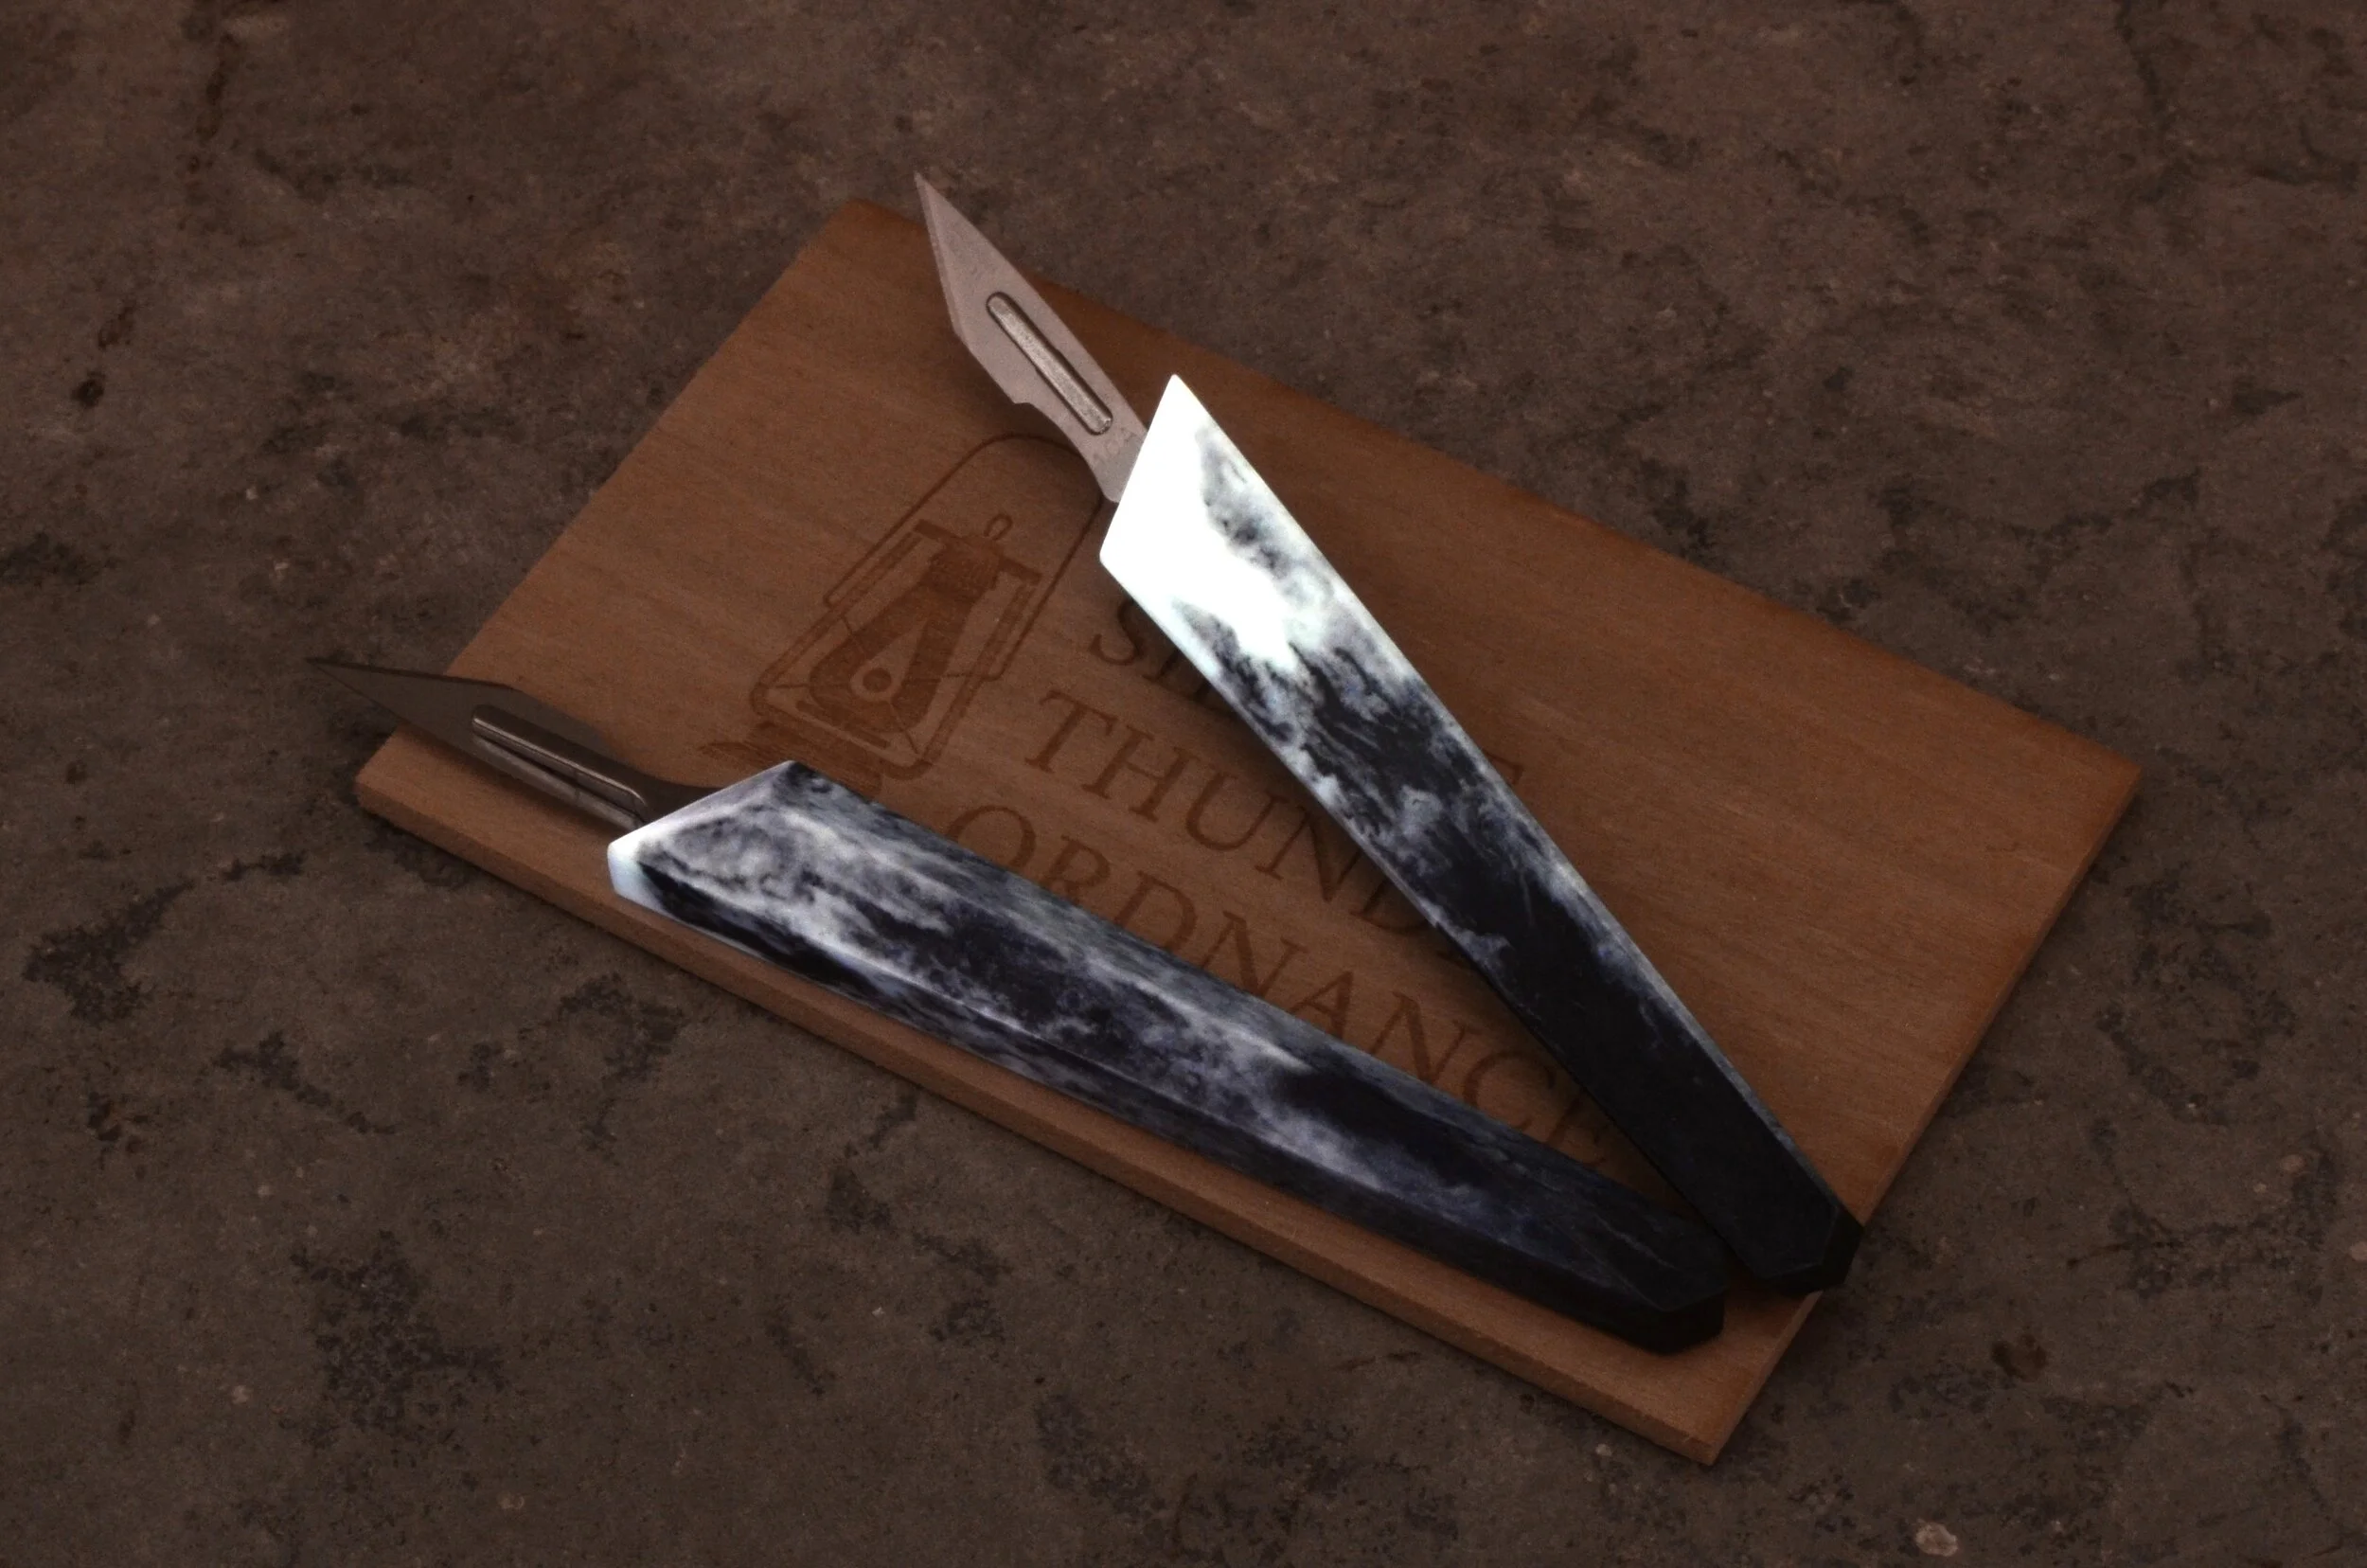
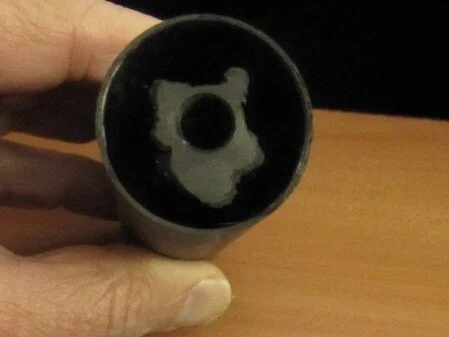
The second failure, pictured above, was more recent. It was a rev.2 Gladius running on a modified .308 Airforce Condor shooting slugs at 80FPE. What went wrong? According to the owner, after approximately 20 shots, the core failed and spit part of the second diode and the damping section downrange. (see images above) The failure was at the second diode in the struts above the body of the diode. While it is hard to see from the picture, there was no failure across a consistent layer. I also broke a couple of these struts to check for strength, and again, no materials issue is evident. This is good, it allows us to rule out a layer fault. The cross-section of these struts is conserved in this area, despite their organic shape, so they do not have a “weak point” per se which allowed different layers to fail on each of the six struts. For those who are familiar with FFF printing, I can hear the shouts already about the anisotropic properties of 3D prints. Let me stop you there though. The diode design places stresses on EVERY axis, there is no permissible weak orientation; a horizontal print orientation is not a solution. Furthermore the design is quite specifically engineered for adequate strength in this orientation. Finally, this material was specifically selected for cores because, among other reasons, it has excellent cross-layer strength and toughness. These material properties are determined in-house with a full suite of test equipment, instead of relying on manufacturer supplied data. This specific carbon fiber reinforced nylon was chosen very specifically for this application because of its exceptional material properties, which include a mere 20% increase in toughness by changing sample print orientations from vertical to horizontal; this is incredibly unusual among FFF materials and is not a typical property.

Everything in engineering is developed with what is called a “safety factor” or “FoS” which is represented by a number. There are slightly varying definitions of how it is determined, but the basic premise is that you have a number which represents the maximum load a part is expected to bear. Your safety factor is then multiplied by that maximum load, and you engineer the part to tolerate a load equal to this new value. Confused? So imagine you have a part which needs to hold 100 pounds. If you had a safety factor of 1, the part would be designed to hold 100 pounds and fail at 101 pounds. If you had a safety factor of 2 the part would be designed to hold 200 pounds, but still is only “rated” for 100 pounds. If you had a safety factor of 3 the part would be designed to hold 300 pounds, and again only “rated” (advertised for) handing 100 pounds. So on and so forth. It could be seen as essentially your margin for error. These safety factors can vary wildly between industry. Aerospace is notorious for having among the lowest safety factors, because these things need to get off the ground. Typical aerospace safety factors are 1.1 to 1.5. Structural members in buildings are typically 2. Pressure vessels are typically 3-4. It is rare to see a safety factor of 10 or greater. I design these moderators to all have AT MINIMUM a safety factor greater than 3.

So all that is well and good, why did this moderator fail? The answer is that, while the rifle was only producing ~80FPE much like the Crown, unlike the Crown it was using SUBSTANTIALLY more air to do so and had less volume (none) to defray that pressure. And that is the common thread here, with both these failures, it was a clear fault of mine: I failed to effectively convey what sort of power/flow the moderator was suitable for. And while design modifications could have prevented both failures, the internal core designs would not have provided good sound attenuation. And that makes this communication critical, not just to prevent failures, but to optimize sound attenuation. Previously I’d suggested people do a little “mental guestimation” based FPE output in relation to the size of the shroud, air efficiency, high drag barrels-projectile interactions (slugs), and shorter barrels for equivalent power. That broke down here. In fact, perhaps it never really functioned and we’d all just been getting lucky and/or banking on most people running airguns within a more modest envelope. So lets break this down in a little more empirical way.

Flow Factor

Empiricism in this case requires numbers, so how to quantify this air output or at least estimate it in a way which is reasonably accessible to everyone? Below is my attempt at this. The equation is somewhat simplified, but is derived from a larger formula based on the ideal gas law I use to calculate this myself. The units are a mess, but it allows us to relatively easily put a number to what sort of forces will be served to the moderator. The equation is as follows:

So this covers the air output, per shot, of the rifle with the units of BARcc/shot. Units must be maintained for this to work, pressures in BAR and tank volume in CC. Shots taken is, of course, the number of shots required to produce the pressure delta above. But there is one thing missing, and that is the shroud. This is where a compensation factor is required. If you have an efficient and reasonably large shroud (the FX Crown shroud is the standard here, having excellent flow into the shroud volume, before the moderator, and is 28mm OD), the equation spits out your final flow factor. But what if you don’t have a shroud, and are threading the moderator directly onto the barrel? Multiply your flow factor by 6. Why 6? Well it has to do with the relative volume of the FX Crown shroud and the gas-diode sections of my moderators. This may seem like a bit of a fudge, deriving this purely mathematically, but it is actually backed by testing on unshrouded rifles. (I can’t recall to what extent I’ve published that research, it is probably an anecdote somewhere in all this, although I reference the lessons learned CONSTANTLY by preaching the gospel of shrouds) I should note that the the application of the compensation factor is purely arbitrary, because I’ve standardized on the Crown. One could easily reverse this and have flow factor represent direct thread and a fractional compensation factor for shrouded guns. In this case though, it is my research, so my arbitrary decision goes. These numbers are only good for comparing with each other anyway, so it doesn’t really matter.

What if you have a shroud but it isn’t as good as a Crown’s? If you have a shroud which is a little small or a little inefficient (shorter length, smaller diameter, or air can enter the shroud but preferentially is directed into the moderator) multiply the flow factor by a number greater than one but less than three depending on your best guess for shroud efficiency. A good guess for most guns is usually 1.5-2. Keep in mind even very small shrouds can produce substantial improvements, so don’t discount them. Conversely, an even larger and more efficient shroud could potentially result in a compensation factor of less than one. And those improvements are seen in the final sound attenuation as well by the way; guns with worse shrouds or no shrouds will simply be a lot louder all else being equal. Yes you read that right, this to a limited extent is also a predictive model of airgun loudness.

So where does that napkin math lead us? Well that gives the FX Crown .22 running ~30FPE a flow factor of 460. It gives the FX Crown .30 running ~80FPE a flow factor of 1,111. A gentleman who provided data on his FX Impact .30 gave a number 725 for 74FPE. And how about a screwball, like the AAA Slayer .30 with a monster balanced vale and no plenum running 220FPE? 11,200. That is a big jump, as you might imagine.

But lets circle back to the point, how about these two failures, what were those rifles like?

Well for the first example, the modified Marauder, there are two big wrenches in the works: first is I don’t have the owner’s full specs list, and second helium behaves differently so it isn’t clear entirely how accurate this model could be. But for the sake of it, I pulled mrod numbers from a product listing and the pressure drop from the original correspondence and went for it. The result is a flow factor 14,822. You might be asking why that is higher than the Slayers? The simple answer is that not all gas released is converted to projectile energy. Far from it. This rifle consumed approximately 500PSI per shot from its cylinder according to the owner.

The second example the owner kindly provided me with detailed specifications permitting much more accurate results. It is an Airforce Condor fairly heavily modified with new barrel, tank, plenum, regulator, etc operating at 225BAR. (yes, that is plenum pressure) And, key here, no shroud at all. This all comes together to produce a flow factor of 15,300. For the astute among you, you’ll notice that means the rifle is consuming 3 times as much air per shot as the Crown for equivalent kinetic energy output and with an equivalent barrel length. Now to be clear, slugs (what the Condor is pushing) do have more barrel drag and lack the self-sealing skirt of pellets so will not be as efficient, but the efficiency gap here is still tremendous. Even I, an owner of an airforce rifle and bemoaner of their inefficient air usage, was startled when all those numbers fell out.

And that, as they say, is that. I hope it provided a valuable little peek behind the curtain on how some of this stuff works from an engineering perspective as well as how these things can fail. More importantly, I hope that going forward this provides a bit of a yardstick to help people select moderators, from any/every brand, which are better optimized for their rifles. And finally, I hope this provides some predictive value for people out there looking for a quiet rifle, because while this model certainly isn’t the last word in sound production/attenuation, does provide a good indication of what to expect.

Next up in the project will be a post about the sound profile of target impacts. Should be a little more casual than all this.

Airgun Moderator Design, Performance, and Development - The Falx (part 15)

Silent Thunder Ordnance

Catch the previous episode HERE.

So first off I want to thank all you crazy people for harassing me to get your hands on, not just a handful of these crazy experimental moderators, but enough of them that you’re actually creating production problems at Silent Thunder Ordnance. When I started I had no idea there was this sort of interest in moderator design and experimentation, it is a pretty fringe nerdy subject , so from all of us to all of you THANK YOU!

If you’ll forgive a little nostalgic reminiscence, I started this whole thing a year and a half ago when I got a brand shiny new FX Crown, which was a lot louder than I wanted, and I foolishly thought I could build a better mousetrap. People started emailing in asking to try one. At first I was just giving them away, the whole thing was just a crazy experiment after all, but that quickly became untenable as they were too expensive and time consuming to produce to just give away in such numbers. So we listed them, secretly, so people could throw a little cash in the hat if they wanted to participate in the experiment. And now this project has outgrown that. It is time to build out something scalable, upgradeable, and with some of the production bells and whistles. It’ll all still be cutting edge and experimental, but key is that it will be modular/upgradeable.

So what does this mean going forward? Well, a couple things. First it means all the carbon moderators are being shelved. All this time I’d been making them by hand, one at a time, which is a surprisingly labor intensive process. It simply wasn’t sustainable.

The second, more important, thing it means going forward though is a new moderator: the Falx. This design is intended to carry all my core principles of light weight, air stripping, flow delaying, and sound damping, which were developed in the carbon moderators, and carry them over to a semi-modular aluminum moderator in the Gladius footprint. This comes with a whole host of advantages. I’ve been working, for a year now and almost entirely unsuccessfully, on a modular moderator design. I sometimes get comments about how easy I make moderator development look. I understand how people get that impression from these blog posts, after all I usually blend a handful of interesting failures in with a few successes, but what you don’t see are often weeks or even months of experiments all of which end in failure and I have absolutely no idea why. Sometimes some thing just doesn’t work out and there is no clear reason. Even the Falx, which rides that line of too-large-tube-diameter, I’d been grinding away at totally unsuccessfully for months. And I don’t mean a little unsuccessfully, I mean producing peaks in the 150+ range on the .22 Crown level of this is hilariously not f*cking working, and having absolutely no idea why. Likewise I also don’t post my incremental tweaks and changes, where moving an aspect a mm or two in one direction or another creates a small gain. Point is there is a lot of grinding and a LOT of inexplicable failure which just doesn’t make for riveting reading. So too was it with truly modular airgun moderators, ones where sections could be taken separately and attached. In the end, it worked, but the results were bigger, heavier, more difficult to produce, and would have been more expensive. Why buy one moderator when you can buy four modular sections at four times the price? Yeah, didn’t make sense to me either. The Falx became my compromise, I call it modular but it is only really “semi-modular” in that the footprint remains the same but I am able to pull an entire core, or core section, out and replace it with another. The semantics of whether or not this counts I leave up to you, but you’ll see me refer to it both ways going forward. Sorry.

This modularity gives me a key advantage though when it comes to moderator development, and you all key benefits when it comes to their use. The out-going composite moderators used a monocore system, caps are held together by a core which is held in tension. This was an elegant solution, but limited space and design elements. Critically, it meant every time I wanted to test something, I had to build the entire moderator. With threaded end caps in an aluminum tube, the core no longer needs to be held in tension. This frees me to make multi-part cores which are modular, serviceable, replaceable, and upgradeable. I can now simply swap internal components in testing, allowing quicker and easier assessment of different design elements. Also things like true floating dampers, multi-axis chambers, and an even wider variety of materials are, not just possible, but utilized to make the Falx even quieter than its all-composite brethren. This is, simply put, the quietest moderator design I’ve ever built, and I’m not stopping here. As new revs. come out, users who want to upgrade will be able to send their units back and get the core swapped to the latest rev.

There is always a catch though, and this is true here as well. There is no getting around it, aluminum is heavier than composites. That said, I’ve done what I can to minimize it. Instead of increasing wall thickness and cost to allow machined designs on the outside of the tube, I opted for a thin smooth wall to maximize cross-sectional strength. For those looking for extra stylish flair, custom engraving is certainly a possibility. The result is a design which, while heavier than its all-composite counterparts at ~180 grams (varies by core), can still meet or beat the trend for mass-to-volume-ratio of other aluminum moderators on the market and absolutely monster it for mass-to-sound ratio.

So now, having gotten that sleazy sales pitch, how did I get here, and how does the Falx actually perform?

The lack of scalability of the carbon monocore designs was actually pretty clear pretty early on. So I started working on something I nickamed the Cerberus, named after the multi-headed-dog because it was meant to, not just solve the manufacturing problems, but sectioned and modular. Each module could be attached to another via what was initially taper mount via threads and what evolved into a taper-and-lug system to ensure concentricity was maintained. And this would mean, instead of being stuck with whatever performance/size envelopes I built something for, people could grab pieces to actually tune their moderators to their rifles. And this is a key thing I want to hover over, the idea that a moderator to perform optimally should be relatively tuned to the rifle. This isn’t so much the case with a typical “hair curlers and washer baffles” design as you’re essentially asking a question of size/weight vs. sound attenuation as sections are all identical, these gas diode moderators have measurably better performance on a rifle for which they’re optimized. So that is great, where the heck is it? Well as it turns out, in solving the old manufacturing problems I created a whole suite of new ones. After all who wants to buy one moderator when you can buy one in 5 parts for five times the price? I beavered away on this for ages before giving up. I think I’ve said this before, but for every test you see here there are dozens of failures that either aren’t interesting or I haven’t the foggiest idea why they didn’t work. And nobody wants to read that any more than I want to take the time to write it all up. Never the less, I think some of these designs are cool so for your perusal I post just a handful of them here.

2020-06-06%2011_49_36-Window.png

This one is probably fairly obvious, it is the rifle mount end section. Notice that honeycomb though? That came about as I was trying to maximize strength and sound attenuation while playing with the 200FPE AAA Slayer. It worked great too, and this filtered down into the Brevitas design. Another clever little track was the primary air stripper/blast baffle. Rigidity increases exponentially with material thickness, the majority of the load is borne by the surfaces, and the neutral plane in theory does zero. This principle is used all the time, from I-beams to composites. I did it here with the blast baffle increasing strength substantially to tolerate the the Slayer’s violence while reducing weight and increasing internal volume/sound attenuation. Kind of a fringe application, but a nifty little trick none the less.

2020-06-06%2011_51_19-Window.png

What is interesting here isn’t the gas diodes, but the wall section. I’m always looking for ways to make one thing do multiple jobs. What goes on inside a moderator is complex, sound and flow are mingled and act together, and if I’ve learned one thing it is that any attempt to JUST damp sound or delay flow will be met with failure, you must attach the problem holistically. So here I created a wall reinforcement that didn’t just increase tube strength, but had high acoustic impedance. In layman’s terms, it significantly reduces the sound wave returned by the moderator walls, while like the honeycomb increasing strength and internal volume. Three jobs in one.

2020-06-06%2011_50_25-Window.png

This was a goofy little experiment, but it worked. You see diodes need to saturate to function. Think of it like a referee’s whistle. If you blow into it softly, the vortex of air won’t form and you won’t get any whistle. Once you reach a certain threshold though it works, and you can keep blowing harder and harder until veins are popping out of your neck and people nearby start moving away from you because you have the acoustic version of serious garlic breath. I digress. Point is diodes are similar in that they require a certain amount of air flow to “saturate” and begin to really function. Below that threshold they work pretty much like conical baffles. So what happens when your tube is too big and you can’t shrink it because it’d look goofy in a modular stack? Well build a tube inside a tube. I jokingly referred to this as mini-mouse, because it is the same concept as the Mus but scaled down to fit this proposed modular platform.

2020-06-06%2011_50_04-Window.png

What is this mess? Well….. so diodes take up space in increments. Exceptions like the one above aside, that space is essentially determined by tube diameter. But what if they didn’t have to? Instead of building discrete diodes, create a single diode as a continuous spiral which folds over on itself again and again and again. Then you could pack precisely as much or as little diode section in as you wanted, and potentially pack them more tightly as well. That was the idea anyway, and this is what it looked like. It was a hell of a thing to design. I built it in this length because I wanted an apples-to-apples comparison against another matching “regular” diode section. Unfortunately it didn’t match it for performance, and I don’t know why. But that is okay, there are only about a million different parameters to tweak to figure out why. I may revisit this at some point.

Is there any relevance to this whatsoever? Well aside from a few elements of this ending up in the Brevitas, some lessons learned here made their way, or will make their way, into the Falx. It is all a big messy endless learning process. The biggest and most significant part here is that I wanted to keep this modularity moving forward and that in turn informed how I designed the Falx’s tube to maximize what I could do with it in future. So lets look at the Falx.

98.9 - Falx Moderate Flow rev.1 as tested on .30 cal 80FPE FX Crown.

So I’ve been playing around with what I’ve been calling Flow Factor, and I’ll explain that in more detail in a future blog post. The short version though is I created a simplified way to estimate what exactly you’re subjecting the moderator to. And, as it turns out, for this diode architecture, the .30 Crown sits on the edge between 2 and 3 diodes. This is where a working version of the spiral diode pictured above would probably have been ideal. But since I haven’t gotten that working yet, I opted for 3 diodes and beefed them up a bit as well. The sound profile also tapers reasonably quickly for the power level, and I chalk that up to the more efficient damping section. It makes this design sound quieter than it meters. I’ll talk a little more about this below.


49.6 - Falx Standard Flow rev.1 as tested on a .22 cal 32FPE FX Crown

I’m really quite chuffed to bits about this one. I never thought I was going to pull off a design which could beat the standard flow Pilum in the same 170mm external length, but here we are. There is actually less available length inside the Falx because of caps and threads and such. How did I manage it? The diodes got a few subtle tweaks, but the big one is the damping section, seen as the iso grid. Those fully floating dampers mentioned above? Yeah, they work. And I’ve got a whole bunch of ideas which I can’t wait to test that could potentially improve it further. The other big thing here is a better way to constrain the inner foam in the damping section. Previously that was integral to the monocore, as a series of load bearing (tension) legs and struts. Now though the center isn’t load bearing, which freed me up to use a larger number of very thin rods. This creates less impediment to the air and sound, so it can more readily enter the damping area. Thus it is quieter. The force is now borne by the iso grid at the perimeter.

And I want to bang on modularlity one last time here, because without it I’d have never figured this out. You see each little change to the damping section produces very small changes, and a lot of those changes are to the post-peak-section. Previously I’d have to build a whole new core for every configuration, and those small changes would have been lost in the noise of core-to-core variation. Here though I could keep the same tube, same diodes, same cap, same everything and change JUST the damping section. Little by little I built up ideas which worked, but just by a little. I could then exaggerate them and combine until enough little ideas that it could make a real impact. I’m thrilled. And this was forward compatible too, working well in the moderate flow Falx.

I like to end these blog posts with a look forward, what am I thinking about next and where am I going? And there are a couple things. I want to do a post about flow factor, how moderator tuning matters. I also want to continue tweaking the internals, obviously. Having a modular design, why stop just when you’re satisfied? So I’ll continue to beaver away at that, probably with increasingly bizarre ideas. And finally I want to play with the envelope a little more, or push the envelope if you’ll forgive the lame pun. But that is all for now. I hope you all enjoyed the read. :)

Night Vision Power Adapter

Silent Thunder Ordnance

Do you ever wonder if, some day, we’ll look back on COVID-19 and think of it as the golden era of weird pet project completion? Well this is one of those, something which otherwise might not merit the time, but now with time to spare evenings and weekends, it just started making sense.

The crux of hunting with night vision is always power supply. You can hunt for hours, but the batteries in your night vision typically can’t. Sure you can bring more batteries, and fumble around in the dark swapping them, but wouldn’t it be convenient if you could just run your night vision off a wall wart and not even think about it? Well that was my idea.

1553633342_7366668795c9a903ea694c2.84354515_IMG_20190325_153235247.jpg

For reference, I’m using THIS UNIT. At STO this style of night vision is so popular, we actually have several kicking around of various generations. We actually prefer these to much more expensive night sights because of their simplicity, reliability, and the fact that they work great with your existing scope. They run on a pair of 18650s, which if you run the illuminator can be drained in a couple hours.

First step is to acquire the requisite wall wart. An 18650 outputs between 3.0 and 4.2 volts depending on charge. Some devices have low voltage cutoffs so you don’t damage cells by over-discharging them, so being somewhere above the minimum is probably good. 4v per cell across two cells means an 8v power supply should be just dandy. So THIS ONE seems like a cheap option. Other devices though may take other numbers of cells, or other chemistry cells for that matter, so SOMETHING LIKE THIS will give you a bit of versatility if you’re reading this blog post and liked the concept but wanted to power a different device.

Next step is to make an adapter. Because I want this to be 100% reversible, I figured just a battery analogue with power on one end would be an easy win. So I designed the “platonic” power adapter, with space for wires to run along the spine, an easy grip for removal, and a crowned face for good contact. This can be zipped out on an FDM printer quite quickly and easily.

IMG_20200327_110739740.jpg

Copper contacts are the next step. This can be done in a variety of different ways, but the easiest is with a little copper tape. The trick is that the adhesive can be cooked off if you aren’t fast and deft with the iron, so use a generous bead of flux, and solder quickly. Wash off the flux, then just peel the backer off the adhesive and stick. A file or a little sandpaper can be used to clean up the edges. Pro tip here, wipe the faces with your favorite contact cleaner/protector so that those pink and juicy fresh copper and lead faces don’t oxidize and start producing lousy connections.

IMG_20200327_111617822.jpg
IMG_20200327_112138379.jpg

Another pro tip, it doesn’t look pretty, but a little silastic on the wires will act as strain relief so the solder joints don’t just break off. It isn’t pretty, it never is, but we’re looking for function not beauty here. All this will be hidden in the battery box anyway. And one final pro tip before you throw this thing in your equipment and run it: hook it up to your multimeter and ensure the polarity and voltage are correct. Consider even going one step further and clearly marking them! Never assume the last monkey on the wrench knew what they were doing or gave a flying f*ck.

IMG_20200330_151905222.jpg

Success! You weren’t expecting a beauty shot were you? ;) It powers up, it works great, and that is good enough. This same principle can be applied to a huge number of different devices to provide wall power for whatever battery-operated device you want.

And I know what you’re thinking: what about an SoR? The answer is yes, however you’ll need a MUCH beefier power supply and to wet the copper contacts with more solder to fortify them against the amperage they’re about to have to carry or use heavier gauge copper plates. We actually have a bespoke SoR power adapter, one which runs off one of our big PSUs. If memory serves, it was built for our endurance testing of the light. But I digress.

COVID-19 UPDATE

Silent Thunder Ordnance

The global pandemic caused by the novel SARS-CoV-2 virus is, inevitably, causing disruptions and necessary changes in practices. We are still accepting and shipping orders, the stock on our website is live, however we’re making a wide variety of changes to reduce exposure and maintain health and safety.

How does this affect you?

First, effective immediately, orders will be shipped M/W/F, rather than the usual next-business-day.

Second, please understand that carrier transit times are longer than usual. With panic buying, workforce disruptions, and people generally staying home, we’re seeing an increase in shipping times. That is to say the time from when we deliver the order to the carrier, and when the carrier actually delivers it to you the customer, is increasing. We’re also seeing an increase in “unusual” tracking activity, that is to say scan events which may not be accurate or representative of what is actually happening. These issues tend to resolve themselves, but we have to ask for your patience and understanding as we all work through this.

Thank you everyone. Please stay safe and healthy. May we all get through this together. :)

Dual Sheath Dashi

Silent Thunder Ordnance

Celtic engraved matched set of left and right handed dashi in a dual-dashi-sheath

Celtic engraved matched set of left and right handed dashi in a dual-dashi-sheath

This was a very special commissioned project. It was so special in fact, we had to hold all photography of it until after it was given as a surprise gift. What you’re looking at are a pair of scalpeldashi, one in Ultramarine Depths and one in Sandworm Ivory. The former is a typical “right handed” dashi, while the latter is left-handed. This is not as simple as you might think, as they are not simple mirror images of each other. The two were paired together in a custom ambidextrous dual-dashi sheath. A celtic knot engraving then covers the the whole piece, dashi and sheath.

While the design was originally conceived as a matching pair sort of thing, around the office we quickly started picking up this dual sheath for our own uses. It will hold two right (or left) handed dashi, and provides convenient quick access to them. Given the huge diversity of blade styles available, this became a convenient way to have multiple on hand.

Celtic engraved matched set of left and right handed dashi in a dual-dashi-sheath.

Celtic engraved matched set of left and right handed dashi in a dual-dashi-sheath.

45 State Bugout Bag

Silent Thunder Ordnance

IMG_20200317_112059616.jpg

What with COVID-19, somewhat irreverently known as the “kung-flu,” tearing its way through the world, thoughts naturally trend toward worst case scenarios. The great toilet paper and hand sanitizer purge is a prime example of this, fear is driving unnecessary hoarding. Grocery stores are being emptied of all TP, and we’re even seeing some of the first known cases of people willingly, in what I can only imagine is absolute dire need, spending real money on “dude wipes.”

On a more serious note though, what would happen, what would you do, if some worst case scenario came to your city and you had to get out of dodge? Are you prepared, and what would your bugout bag look like? In a way, it is EDC on steroids. I should also add that this ought to be tailored to you personally, matching your skills and likely bugout environment. Carrying a survival saw for example is incredibly useful in a forested area, however in the middle of a desert maybe not so much. Likewise if you haven’t been put through survival training, a proper compass may not be particularly useful to you. It is also meant to complement what I already EDC, but not replace it. I also built it out to be what I call “45 state legal,” which is to say something you could carry almost anywhere. Even in most of Europe, this should be more or less legal. That means, specifically, no firearms. Should it be that kind of bugout, there are a whole suite of different things, weapons, armor, and ammo which ought be carried, and are beyond the scope of this blog post. So here is my bugout bag, built with the expectation of, not long term outdoor stays, but short term outdoor “excursions” to get out of dodge, or get places which otherwise may be hard to get.

IMG_20200317_111435178.jpg

Food/Water/Shelter

  • Mylar emergency blanket - too small, light, and useful not to have. Good for survival, but also emergency signaling as it is bright gold on the outside.

  • Mylar tarp - heavier duty, longer term, grommets at the corners, and OD green on the outside so reasonably camouflaged. This is a repeat use item rather than an emergency one. I’ve spent more than one night under this.

  • Bug net - you can wear long pants and sleeves, but just a few bugs in your face can make life really tough.

  • Serious socks - wool hiking socks. These are dual purpose, working as emergency mittens if necessary.

  • 5 mil contractor garbage bags - these fold tight and serve a million and one purposes. They burn well, they build shelters, they make a serviceable rain poncho, they can carry water, solar still, bedding, the list just goes on and on and they are very compact. If you’ve been through survival training, you don’t need any more explanation on these.

  • 2 liter Nalgene

  • 2 liter water bladder

  • 1 liter water bladder w/ integral filter

  • Water filter - why so much water capacity and two filters? You can go weeks without food, but if you’re hiking hard you’ll consume water at a staggering rate. Good sources are also not always easy to come by. Stock up when you can, and be sure you have a way to purify it on the move.

  • No food - The plan isn’t to spend months outside, just days, and most of that time should be spent covering ground as rapidly as possible. A few days without food is no big deal. If you need some though, as crazy as it may sound, dry dog kibble is a great choice. Why? It is nutritionally dense, light weight, shelf stable, and you’re not going to snack on it frivolously so it’ll still be there if you ever REALLY need it.

IMG_20200317_105847718.jpg

Emergency Medical

  • Basic medical kit - A trick here is to get a basic medical kit and then supplement it. Many of the things below are simply that. This makes it easy, and gives you a convenient case to keep everything together as well.

  • Lighter - I know we sell two types of lighters, and I still recommend a bic lighter here. Why? An arc lighter doesn’t sterilize tools well, and a wick based butane lighter slowly leaks fuel. Neither are a good way to store energy for years and years without attention or use. Meanwhile a couple cent bic lighter will be around forever.

  • Superglue

  • Steri-Strips

  • Nylon monofilament needled suture - when you need to suture something, there is little else which will substitute. They also can be bent into an emergency fish hook.

  • Triple antibiotic ointment

  • Bandaids

  • Tongue depressors - dual use, medical and kindling in an emergency.

  • Gauze - same as above

  • Potassium iodide tablets - thyroid blocking in a radiation emergency

  • Tweezers

  • Silicon nitride tipped tweezers - can be sterilized in fire without damage

  • Sterilizing wipes - “moist towelette”

  • Sterile gloves

  • medical tape

  • safety pins

  • Sterile scalpel blades

  • benzocaine pads

IMG_20200317_112059616.jpg

Tools & Weapons

  • Large knife - 8.1” Morakniv with sheath. We live in an age of embarrassment of riches, with so many great options on the market from Busse/SYKCO to ESEE to SURVIVE!, however part of a bugout bag is it doesn’t get used all that often. So a couple hundred dollars for a big knife that’ll rarely be enjoyed might not be money well spent. Contrast that with a big Mora. They’re tough as nails, well made, light weight, work great, and can be had for embarrassingly little money.

  • Scalpeldashi - serves the “small knife” requirement. Incredibly useful. Spare sterile blades too.

  • Sharpening stone

  • Survival Saw - Boreal 21 is my pick, even better than the vaunted and no longer available Sawvivor.

  • Slingshot - I specifically bring a Harpy, but bring what you’re accurate with rather than what is smallest. Should the time come, you won’t be thankful your slingshot is tiny, but you will be thankful your slingshot is one you’re very accurate with. Wrap this in a protective bag to keep it away from oxygen and light. Not only is a slingshot a great weapon/diversion tool, ammo can be picked up as you go giving it almost “limitless” capacity.

  • Spare bands, wraps, pouches, and ammo - Wrap these in a plastic bag as well to keep them in good shape for when you need them. I’m partial to alliance bands, as they’re much longer lasting, both use and storage, than typical exercise bands.

  • Eyepro - not just from projectiles (you are bringing a slingshot after all) but from sun and weather. It sounds goofy, but you only have the two eyes. An inexpensive pair of impact rated glasses, tinted or not, cost almost nothing and weigh almost nothing. They also go well with firearms, should you be bringing those.

  • Paracord - I always wrap this on my knife sheath. Handy place to store it compactly, and right next to the tool you’ll need to use it. Don’t skimp, real milspec 550 cord comes on big spools for surprisingly little money.

  • Ferro rod - I know I said a lighter above, however even the enduring Bic is transient and easy to ruin next to a ferro rod. This will sit idle in your pack practically forever and always produce hot sparks when you need it.

  • Orienteering Compass

  • Lockpicks - multi-use. Picking locks? Hopefully not. They’re very thin spring steel with useful shapes though to be a probe, prybar,

  • Monocular - (daylight)

  • Faraday bag - Even when turned off, your phone is never truly “off,” and surveillance increasingly leans on technology. A faraday bag you can drop your phone in and truly go dark is compact, light weigh, good for other things, and a cheap hedge should you need to “disappear.”

  • Backpack - all this gear needs to go in something. In this case I’m using a Teton Sports Oasis 1100. It is very light, well thought out, lots of useful quick-access pockets, includes hydration, an emergency whistle, and an integral rain fly. Don’t take this as an endorsement per se, it works, but I’ve also not taken this bag to hell yet. As a result it looks good on paper, but nothing is ever truly great until field proven.

Things Unsaid

  • Hiking Boots - you’re going to be covering ground. Have a good pair of boots, ones broken in and proven.

  • Season appropriate clothing - winter in the north or summer in the south of the United States can be brutal. Seasonally appropriate clothing is critical. Wear it/bring it with you.

  • Flashlight - Batteries don’t store well. As a result, this is an EDC item rather than a go-bag item as it can’t be practically stored in a state of readiness. Keep in mind a light with very long battery life is much more useful than a pocket rocket. Potentially a relatively dim red light is also highly useful.

  • Phone - you’d expect to find this in your pocket, not your bugout bag. These tools are oh so useful for easy orienteering, info, etc but they’re a double edged sword as they can be used to track you and are notoriously unreliable when you need them most. Don’t be dependent on your phone.

  • Cash

  • Map - grab one for wherever you’re going before you leave.

  • Pet supplies/Bugout Bag - You’re not going to leave your beloved and loyal companion behind are you? Pack a bugout bag for your best buddy as well. If you have a dog for example, bring the basics you need to cover ground, such as a water bowl so they can drink without lots of spill, and a wrap if they break a claw or tear a pad. The last thing you want is to have to carry your animal. Dogs in particular can be incredible assets as well, being extremely alert and astute.

  • Keep it light! - Remember the point of bugging out: to cover ground, and cover it fast. This isn’t a camping trip.

  • Have a plan! - Have a reasonable plan for where you’re going, how you’re going to get there, and how long it is going to take. Preferably let someone know this.

  • Store your bag somewhere useful! - I keep my bugout bag in my car. Why? Because wherever I’m going, my car is probably going to be the first step to getting there. It also allows me to carry a lot more other gear I’m not planning to keep on my back.

The whole thing, including containers but not the water they carry, weighs just 4.2 pounds. A key idea to bugging out is to NOT put yourself in a survival situation. Have a plan, and strive to ensure this doesn’t become a survival situation. And that is part of the mindset here. Long term, you have incredibly poor prospects for survivability, producing enough food to sustain yourself alone in the wilderness is incredibly difficult. Thus this bugout bag doesn’t have such lofty goals. Again, the plan needs to be a relatively quick jaunt from an unsafe area to a safe pre-existing shelter which is out of the crisis epicenter. If it is going to be weeks of hiking, you require a LOT more gear, and largely that is gear oriented for the season you’re currently in. Also don’t undervalue your car. Tools, weapons, ammunition, maps, food, water, fuel, loved ones these are all things easier for your car to carry than your arms and legs. Take the easy road as long as you can.

I hope this was interesting, and potentially inspirational, for your own bugout gear. Everyone has their own skill sets, and how that interacts with location and season. Personalize and pack your own bag accordingly. May we all never need it. Stay safe and healthy everyone. :)

IMG_20200317_113149367.jpg

Product Introduction - Full Throated Scalpeldashi

Silent Thunder Ordnance

Fullthroat scalpeldashi. Bottom is silicon carbide which has been copper washed and engraved

Fullthroat scalpeldashi. Bottom is silicon carbide which has been copper washed and engraved

Ever since we introduced our original scalpeldashi, we’ve gotten requests for a longer full-throated version. Something with more handle, which can still fit easily in a pocket, but is equally at home on a desk. So this, is that. We’ve added fullthroat dashi to our standard lineup in our popular silicon carbide composite, a rugged material in stealth gray. We’re, of course, also doing one-offs and customs in this new style too.

Another advantage of the longer handle is more real estate for engraving. As seen above, some really beautiful and exotic things are possible, from sweeping natural curves to alien artifacts.

Fullthroat dashi in nocturnal blue and glow in the dark ivory

Fullthroat dashi in nocturnal blue and glow in the dark ivory

Airgun Moderator Design, Performance, and Development - American Air Arms Slayer and Brevitas (part 14)

Silent Thunder Ordnance

Catch the previous episode HERE.

Perpetually short on time, I’m going to hopefully keep this one brief. Previously, I talked a bit about two projects I was working on. The first was an American Air Arms Slayer mod (two in fact), and an attempt to make the smallest and lightest moderator possible/pragmatic for the FX Crown which I nicknamed the Brevitas. This post introduces essentially nothing new, but concludes those projects.

FX Crown with Brevitas moderator

FX Crown with Brevitas moderator

The issue with the Brevitas wasn’t one of acoustic performance, but rather mechanical performance. coming in at less than 30 grams, 74mm in length and 28mm in diameter, this was never going to be the unspoken last word in silence. That said, both on the .22 and .30 Crowns it brings the peak down below the factory performance with the shroud extended while being about half the length. But mechanical performance, what do I mean? Well the long and short of it is I wanted better impact resistance. Moderators will be subjected to baffle strikes eventually, and being on the end of your gun may just be banged into things from time to time, so I wanted better. A surprising amount of material development went into this, but I can happily say the material now out-performs ABS and Nylon on the IZOD impact tester. It also is translucent, which I think is pretty darn cool as you can kinda see what is going on inside it.

Brevitas TD FX Crown .22 and .30 (two different mods. Note traces are different scale) - 162 & 609.3 respectively

So what about the Slayer? Well the final test for that is in. The slayer is pretty violent, so I wanted to make both mods quite robust. I nicknamed them the Gladius HP and Brevitas HP because both are heavily built high power specific adaptations.

IMG_20200217_112655363Eb&W.jpg

First up is the Brevitas HP. I kinda winged this design, took a few educated guesses, and went with it. As luck would have it, it ended up quieting the Slayer more than the factory mod. This isn’t a huge accomplishment as the factory design had just a couple very long tapered cones, more of a contained air-stripper than a moderator/suppressor, but wherever I can shed weight and length I’m happy, and this did that. And just as a quick reminder, the Slayer is unregulated, and so its sound signature changes considerably across the discharge cycle. The number is just an average, and the trace I pick is meant to be representative of the set, rather than the average necessarily.

Brevitas HP Slayer .30 ~200FPE - 701.71

Slayer Brevitas HP.png

And, finally, the Slayer - Gladius HP combo. I really was somewhere around the sound signature floor with this one. Depending on the test, the tube ping was louder than the muzzle report, which skews the average high. Never the less, I’m happy with the result and (by his comments) the gentleman who loaned me the rifle was as well. And, honestly, that is what matters most. There could be a whole massive thread on depinger design and optimization as well, but in this case these slayers are 3K$ a pop, and I didn’t want to mess with it. ~3000PSI air and potentially explosive decompression can both do weird things to materials, both immediately and over time, and the last thing in the world I wanted to do was put some crazy untested hardware into someone else’s very expensive toy which could damage it or simply make a mess. So here we are.

Gladius HP Slayer .30 ~200FPE - 526.67

Slayer Gladius.png

That is it for now. I realize this was a bit of a quick and sloppy post. I wanted to get everything written up and and out there. This Slayer ended up being a bit of a spanner in the works, the project dragging longer than I’d have liked, so as fun and challenging as it was, I’m also kinda glad it is finished.

Where to from here? Not sure. Ideas for more small and asymmetric designs have been percolating in my mind for some time now. The Leshiy was too asymmetric, that is to say the bore was so close to the wall that serious design/performance compromises had to be made and acoustic performance was lost relative to total length/volume. But what about an asymmetric design that made no scarifies? Something more akin to the Mus, a moderator inside a moderator, except instead of pushing the limits in terms of scope clearance, that extra reflex volume could simply sit below the bore axis out of the way? And what about the little Brevitas? I made the design 28mm because that was the OD of the Crown’s shroud and smaller would look ridiculous, but the TKO I tested was much smaller diameter and there are other guns with skinny shrouds where such a design could be just the ticket. What about something like that, something to push those limits? As always I have more ideas than time to design and test them. For now, I hope this post was interesting, informative, and entertaining.

IMG_20200217_112824803Eb&w.jpg

Scalpeldashi Blade Styles

Silent Thunder Ordnance

Scalpeldashi showing 5 blade styles we frequently use. Handles/blades are, from left to right: Bubinga/#10A, Sandworm Ivory/#40, Summer Sunset/#11, Ultramarine Depths/#10, and Cuttlefish/#16

Scalpeldashi showing 5 blade styles we frequently use. Handles/blades are, from left to right: Bubinga/#10A, Sandworm Ivory/#40, Summer Sunset/#11, Ultramarine Depths/#10, and Cuttlefish/#16

We get this questions often about what scalpel blades are available, will they fit our sheath, and which is your favorite? This post is an attempt to answer that question.

A common graphic showing just a handful of the huge number of different scalpel blade styles.

A common graphic showing just a handful of the huge number of different scalpel blade styles.

To the right is a typical image used to sell some of the more common blade styles. It is far from exhaustive. Blades are available at extremely modest prices, the most common ones are less than 5 cents each if purchased in bulk. More typical pricing is in the range of 7-12 cents per blade for a 100 pack for common styles. Less common styles, blades sterilized by gamma radiation, and stainless steel blades can all be priced a little higher, but are still very inexpensive.

Our seven favorite styles are #9, #10, #10A, #11, #12, #16, and #40. (we offer a sampler pack if you want to give them a all a try) Far and away we use #10A the most, and it is what we supply with every dashi purchased. It is fairly rigid with a fine point, allowing an incredible amount of force to be put behind it. This gives it great precision for accurate work like marking/scoring, but it is perfectly functional for carving, general utility, even opening packages. Its angular style was actually an inspiration for the scalpeldashi itself years back. #11 looks similar, but in practice is very different. It makes sacrifices in rigidity for a more slender blade and even more acute point. It is fantastic for cutting very fine details, particular when accessibility is limited. Both #11 and #16 are sometimes heated, bent/formed, and re-tempered to make specialty tools/cutter heads for unusual applications where sourcing a commercial blade would be difficult. Speaking of #16, this is another good general purpose blade. Wickedly sharp, like all scalpels, with a straight edge and utilitarian sheepsfoot blade it is also great for general purpose but also excels at scraping. Not surprising as it is closely related to a dermaplaning blade. (for those who don’t know, dermaplaning is a common cosmetic procedure where the surface of the skin is scraped and shaved removing the top layer of skin. It is actually rather similar to straight razor shaving in some respects.) #10 is made for slicing, and slice it does. Slicing in softer materials is where we most commonly use this blade. #40 is a double edged blade. Aside from the advantages when piercing or cutting thin slots in material like leather, this blade actually is very useful for EDC. It is a very utilitarian shape, but you get effectively two blades in one. Double the edge retention or keep one exquisitely sharp for critical tasks while you abuse and dull the other edge. #9 is the weird love child of a sheepsfoot safety blade and a chisel. Push cutting in confined space, cutting along a surface but not the surface itself, and scraping are where this blade excels. Genuinely not sure why this blade isn’t more popular, as it is hard to replace. #12

What about sheath fitment though? After all, if you’re going to carry one as part of your EDC, it isn’t much use if you can’t carry it with you. All of the aforementioned styles fit in our standard sheath, though #9 and #12 can be a bit of a squeeze. The reason for this comes down to how the sheath works. You see, most sheaths grip the blade of a knife. Our sheath actually contains torsion bars which grip the scalpel’s bayonet instead. This frees up the design to happily carry a wide variety of blades.

Hopefully that answers the common questions and is a good primer on the subject. Blade preference can be as much about personal taste as application. Thanks to the immense diversity of blade styles available though, there is something for everyone out there.

IMG_20201223_154240097E.jpg

Product Update - Scalpeldashi

Silent Thunder Ordnance

Three chameleon one-off scalpeldashi. From top to bottom: yellow to green, blue to purple, and green to red.

Three chameleon one-off scalpeldashi. From top to bottom: yellow to green, blue to purple, and green to red.

Late in 2019 we promised a shakeup of our popular lineup of scalpeldashi for early 2020. Well here it is! New and better materials, cooler colors, and even tougher than before. And all this while cutting prices, which start at just 25$ for our silicon carbide dashi. (including sheath)

With this launch comes three one-off chameleon dashi. (pictured above) You may recall our chameleon skin finish on our old dashi. This is similar, except now it is no coating, it is swirled through the entire handle! Colors change based on the angle of the light striking it, and the depth and life in the material is impossible to photograph. From top to bottom they are: yellow to green, blue to purple, and green to red. These will be on sale for a limited time.

We’re also accepting orders for custom work, from custom engraving to complete custom dashi to entire custom production runs. If you’re looking for one….. you know what to do. ;)

Airgun Moderator Design, Performance, and Development - Summary of 3 new moderator designs (part 14)

Silent Thunder Ordnance

Catch the previous episode HERE.

I've been quietly beavering away on a moderator project all this time, a project which ultimately was a failure. The idea was to create a truly modular airgun moderator where, instead of just stacking otherwise identical sections where all you are choosing is how loud/quiet and long/short you want your moderator to be, you actually change different modules to tune your moderator to your gun. And this is in line with my research on regular non-modular moderators where I determined that different rifles want different ratios of flow delaying and sound absorbing in a given size envelope. My idea was that this could speed up my research because, if I wanted to try a new configuration, I could make a new module and JUST a new module keeping everything else identical. Unfortunately, ultimately, this whole thing was a failure. The first problem was that each module was a bigger pain in the butt to make than a whole mod, so it didn't actually save any time or effort. And as for the design itself, it worked, but not well enough as the connections between sections took up too much length and volume and weight. So, ultimately, I learned a lot but had to abandon it.

This all got me thinking though: why did I start this in the first place? It was because I wanted to shrink the length and weight of the junk I hung on the end of my barrel. So, I struck out in that direction. In this series of tests I was primarily working on two things: 1) making a MUCH smaller mod and 2) making a more versatile mod.

So the interesting thing I learned working on the Mus was that gas diodes actually need to be tuned to a flow and air volume in order to work effectively. Otherwise they act more like a flat baffle. How can I improve on this? Before I used compound gas diodes, a quasi diode inside a full diode. This was about the limit of how small I could make something given the tube diameter constraints. But what if I moved up to a slightly larger tube, one small enough I'd avoid at least some of the large-tube-diameter issues encountered by large OD moderators, but large enough I could fit a gas diode inside a gas diode? So I thought I'd move up to a 40mmOD tube with the same 170mm overall length and see what I could manage. I've nicknamed this size the Gladius.

Non-compound Gladius Crown .22 – 81.67

SD Gladius Crown .22 – 61.00

DD Gladius Crown .22 – 65.00

So the above three are all on my .22 Crown, same as always. The non-compound Gladius is basically just a scaled up gas diode, and clearly is not as effective. (this is not surprising) The SD and DD Gladius designs are about equal in terms of performance both with each other and are almost as good as a Pilum. Given the tube OD increase, I'll call that a win, as the point was to “prove” the DD Gladius could be effective on the .22 Crown. But the other point was to make a more versatile design, so what about the DD Gladius on the .30 Crown?

DD Gladius Crown .30 – 77.67

DD Gladius VP30.png

So there was a weird outlier on one of these shots. Keep in mind that each test is sampled by TWO pickups simultaenously, and so when the wind or some other unknown factor on rare occasion throws a weird spike, it can be discarded. Without the outlier removed the average was still a respectable 84.25. So this is a win, in a big way. Keep in mind the Mus averages 82 and 79 for the .22 and .30 Crowns respectively. And the post-peak sound is good on both tests as well. This makes the Gladius an improvement over the Mus across the board. The one area I'm a little iffy about is the post-peak sound, as the Gladius looks comparable to the Mus but despite tinkering with RMS I just don't have a good way to quantify it. It sure sounds good to the ear as well though.

So the Gladius is big, smaller than the Mus, but still quite big. And I wanted small. I started with the Levitas, and promptly rushed to size in a pursuit of ultimate silence. What about going in the opposite direction? After all, most people are willing to pay a serious price in terms of mechanical complexity and dollar cost to cut 6” off the length of their gun by running a bullpup. What good is all of that if you then stick a stonking great mod on the front to quiet it down? So in pursuit of tiny I wanted to see just how small I could go. Remember the TKO was basically a cigar in size and performed quite admirably. So I made a mod the size of a fat tube of chapstick, that weighs 20 grams, and in the spirit of the Levitas I named it the Brevitas. I'm not kidding about the size:

IMG_20191220_101825499.jpg

I would have made it skinnier too, but that is the OD of the Crown shroud and any skinnier would have just looked goofy. You might be asking how well such a teeny tiny mod could perform?

Brevitas Crown .22 – 185

Brevitas Crown .30 – 640

Brevitas VP30.png

Keep in mind that, with the shroud retracted, the Crown .30 meters at 733. Put another way, this more effective than extending the Crown's factory shroud, while being less than half the length. It sounds a little “whooshy,” kind of like a hollywood suppressor actually. This was just a crazy idea, and there is some tweaking I need to do to it. There are also some alternate configurations I want to test. I had no idea if this would work in any way shape or form, but I'm cautiously optimistic about the results of this test. I did cheat though and make the bores a little too tight relative to the projectile, so these numbers may creep up as I enlarge the bores and hopefully go back down as I test other improvements. All in all though, I think this is really cool and really unique. I'm not aware of any mod out there anywhere close to this tiny.

Finally, a gentleman has very kindly loaned me his AAA Slayer to build a mod for. The name is apt: is has a tendency to slay moderators.... particularly in interesting and unexpected ways. You'd expect it to just blow up tubes, and it hasn't done that a single time yet. Instead it has caused all manner of other interesting problems. I've been beavering away at this for some time now, but never had anything worthwhile to show for it until this most recent test.

Slayer .308 ~200 FPE – 608.5

So there are a lot of interesting things about the Slayer, too much to go into here. But one of them is that the tube ping is incredibly loud. You probably saw my previous post on the subject, and that peak is actually from tube ping not the uncorking event. Cool huh? I'm going to continue ruggedizing this moderator design, so this is not a final version, but so long as I'm at or below the air tube ping I'm happy. Unsurprisingly, this mod is all air-handling, there is no room for anything else. I'm doing it in a Gladius size tube to fit the general requirements of the rifle (like accessing the gauge) as the Mus is simply too large.

This was just a quick summary of whats cool I've been working on. Honestly there is just too much to write it all up, but I hope this was an interesting albeit long overdue update.


SALE! - Scalpeldashi

Silent Thunder Ordnance

Scalpeldashi 4 colors.jpg

Scalpeldashi, a popular product of ours, we all love them and all carry at least one. We’re changing our lineup for 2020 though, and so we’re putting all our traditional coated polymer scalpeldashi and sheaths on clearance, up to 50% off. Get ‘em while they last, because they will not be restocked!

Out of Office 12/23/19 to 12/27/19

Silent Thunder Ordnance

Happy holidays to everyone! We all will be out of the office from 12/23/19 to 12/27/19. During this time period we will not be able to process orders or respond to inquires, please accept our apologies. Service will resume as normal 12/30/19.

Airgun Moderator Design, Performance, and Development - Air Tube Ping; An Interesting Finding (part 13)

Silent Thunder Ordnance

gladius-slayer indicated.png

Catch the previous episode HERE.

Yes, I’m still here, and I’m still playing with moderators in my copious free time. I spent a lot of time playing with a new piece of technology, figuring it out, and some cool, interesting, and pretty unique things are on their way along with more testing. That is all for later though. Right now I want to talk about something very interesting I discovered regarding tube ping, namely that IT GETS LOUDER. Didn’t expect that? Don’t understand what I mean? Let me unpack.

The above trace is a .308 American Air Arms Slayer. It is a powerful slug-throwing gun running about 200 foot pounds at the muzzle. It is unregulated, runs a tube, guzzles air, and runs some balanced valving witchcraft. All this means that the valve opening and closing events, as well as the total amount of air removed, are relatively violent events in the air tube. Unsurprisingly, this leaves the rifle with a very pronounced “ping” when it fires. Several months ago, I was approached by a gentleman who wanted me to develop a moderator for his Slayer. It seemed like a fun challenge at the time (spoiler alert, its been a pain in the tuchus), so I took him up on the offer. It has been a bit of a roller coaster of hope and failures, but I just finished testing a design which is quieter than the tube ping, and THAT is interesting.

To be clear, I’m only pretty sure of all this, you can never been 100%, but looking at the timeline, other tests, so on and so forth it seems to be the only thing that makes sense. So, in the above trace highlighted in yellow, you can clearly see the “uncorking event,” that is to say the moment when the pellet exits the muzzle of the moderator. It is a bit messy here, because it is all mushed into the tube ping….. which clearly increases in amplitude over time. This might, on first blush, sound a little screwy. How, after all, could the tube ping get louder AFTER the most violent event (valve opening/closing)? If you think about it for a minute though, this actually starts to make sense. When the valve first opens, the air/sound in the tube won't be moving in a uniform wave. The air nearest the valve will expand substantially more than the air nearest the gauge. Similarly when the valve first closes, the air won’t all simultaneously stack up at that end of the tube in a pressure spike because it isn’t all going at the same speed. It takes a couple cycles back and forth for that air movement to coalesce into a uniform sound wave front and thereby reach peak amplitude/intensity. Then, obviously, hysteresis naturally damps it back down to zero over time, in this case a much longer time than was sampled. Look at that happen too. Initially the sound is messy, very messy (look at the area between the yellow highlighting and the teal highlighting), and it actually takes a little time for the wave to coalesce around its primary frequencies. As it does so, it increases in amplitude! I was COMPLETELY not expecting this, but now that I've found it, I thought I ought share it.

This naturally leads to some interesting ideas on the design of depingers; they don’t have to break up the wave front to function, they simply need to stop it from forming in the first place. This suggests entirely different avenues of design, some in the same vein as existing designs granted, but others completely novel.

Cool stuff eh?

Out of Office 11/28 - 12/1/19

Silent Thunder Ordnance

IMG_20191011_160749347EDITED.jpg

A very happy Thanksgiving to everyone! In observance of this holiday, and giving thanks to our friends and family, we all will all be out of the office from 11/28 to 12/1/19. During this time period we will not be able to process orders or respond to inquires. As a small thank you, we’re offering a 10% discount, site-wide, just enter the code “9ULZASI” at checkout.

Project - Scope Throw Lever

Silent Thunder Ordnance

IMG_20191022_153625322EDITED.jpg

The concept is far from new: magnification rings on scopes can be stiff to actuate, thus a throw lever to increase the mechanical advantage and grip is an obvious accessory.

A small objective 1-6x scope I think is underappreciated in the realm of airgunning. It is well suited for close range hunting/shooting, but still has the magnification to reach out for some longer shots. It’d be a great fit on an FX Dreamline Compact for example, or many of the popular super compact bullpups. In this case we’re looking at the AIM Sports Alpha 6 1-6x24 30mm Riflescope. It is a very nice little optic for an airgun and <100 yard work on varmints of various flavors, and it has a bunch of other nice little features. It’d be an especially good fit on an Edgun Leshiy though, where the small (24mm) primary objective would allow it to clear the somewhat inelegant upward bulge of the Leshiy’s integral shroud without sacrificing size on the ocular. It has a handful of other nice little features as well. But this blog post isn’t meant to be a scope review.

And so, needing a throw lever for this scope and with no obvious commercial option, we set about making one. And if you’re going to build something, why not improve it, add a bit of flair? In this case we made the throw lever and ring from 20% carbon fiber reinforced nylon, a fantastic material and way overkill durability-wise, for this application. We also added two glow elements though. These are only visible from behind the scope, so they won’t alert whatever you’re hunting, but mean at night it is easy to locate your throw lever/know your magnification.

Custom throw lever for a clever little scope? Done!

IMG_20191022_153517062EDITED.jpg

Put a trit on it - Spyderco Autonomy 2

Silent Thunder Ordnance

Tritium vial holding GITD insert for a Spyderco Autonomy 2. Seen here with our arc lighter

Tritium vial holding GITD insert for a Spyderco Autonomy 2. Seen here with our arc lighter

As part of an ongoing project to get tritium on literally everything, we embarked on a (short) journey to get one on the Spyderco Autonomy 2. Not satisfied to place it just anywhere though, we went with the fire button, making its location easy to find and the entire knife to orient even in the dark. Holding the trit is a GITD insert, for double the glow.

Project - Borescope down a Smooth Twist X barrel

Silent Thunder Ordnance

First, an obligatory safety message: airguns are dangerous, and should be treated with the same safe handling practices as firearms. Do not replicate what was seen/done in the above video. Please note the rifle was degassed for this, for safety reasons. Even still, this violates several best handling practices and should not be copied.

So what exactly are you seeing here? Well, this is a .30 caliber Smooth Twist X barrel on an FX Crown. Note that the camera starts rotated approximately 90 degrees clockwise from vertical, and so the brass transfer port actually appears on the right hand side.

0:00 First you see the bolt probe, slowly being retracted, and the magazine indexing a pellet. Note how rapid/violent that is. It really chucks that pellet sideways surprisingly forcefully. No wonder groups shrink when pellets are single loaded as opposed to magazine fed.

0:13 The pellet starts to be fed forward. Again keep in mind the camera’s rotated perspective. The pellet slowly noses its way forward.

0:21 The pellet visibly engages the rifling here, showing slight deformation at the points. Notably, this is key to good accuracy on most airguns and firearms, firing the projectile before it has engaged the leade will tend to result in poor accuracy.

0:36 We’re just examining the bore here. Note this barrel has not been cleaned at all recently, so lead buildup should represent normal use. The majority of the bore appears quite smooth, although far from flawless as there are clear tool marks of some sort at various points. Notable is the leading of the lands, while the grooves appear remarkably untouched.

1:07 Now we’re at the choke. I would recommend you pause the video here, click the little gear in the bottom right hand corner, and set the playback speed to 0.25 (1/4 normal speed) and watch the whole thing carefully, potentially multiple times. It is VERY interesting. Its significance is difficult to fully discern, but the leading certainly suggests the pellet goes from riding the lands to being constrained by the entire bore in a very short distance. There is also, at least the appearance, of the lands getting wider toward the muzzle within the choke.

1:14 Out of the bore and into the liner system. Visible here is the liner retention tubular bolt and the inside of the internal shroud brake.

So what all this means is very much subject to interpretation. There is a great deal of speculation regarding the Smooth Twist and Smooth Twist X systems, how they are similar to and different from conventional rifling, etc. So here it is, a solid video showing a peek behind the curtain of what exactly is in the bore. Hopefully it is interesting, if not otherwise useful.

Light of Xiuhtecuhtli - Teaser

Silent Thunder Ordnance

Just a little teaser of the LoX as we work on it here. Long exposure photography makes it easy to “cheat” beamshots, a 5 minute exposure in an area with little light pollution will make even a 5$ zoomie look impressive, however video is another matter entirely. The necessary frame rate and ISO make it much clearer if you’re cheating the shot. In this case, this 9 second clip was filmed on a potato quality cell phone camera. In short, yes, it is just that bright.

Project - Scalpeldashi Pocket Clip

Silent Thunder Ordnance

Chameleon skin scalpeldashi w/ carbon fiber sheath and titanium pocket clip

Chameleon skin scalpeldashi w/ carbon fiber sheath and titanium pocket clip

It is all too common a refrain in the flashlight world “well that is great, but does it have a pocket clip?” We got a customer request for exactly that, rather than carrying it as a neck-knife or keychain-knife, they wanted a corner-of-the-pocket carry system.

There are lots of different types of clips possible, but in this case we went with a 6Al4V titanium deep carry pocket clip and stainless hardware. It carries light and out of the way in the pocket, it is exceptionally convenient, and looks good too. It all worked out rather smashingly.

Chameleon skin scalpeldashi w/ carbon fiber sheath and titanium pocket clip

Chameleon skin scalpeldashi w/ carbon fiber sheath and titanium pocket clip